The Noteflow User's Guide
Thanks for downloading Noteflow!
There are many advanced and subtle features to discover.
Bookmark this page as a handy reference.
Noteflow vs. Noteflow+
Note: The Standard Edition of Noteflow has a subset of the features listed here.
Open the special document named "Try Noteflow+" in the App for a list of the differences.
The Gallery
Noteflow opens to a list of available books (files).
Tap on a book to open it.
Creating new Books.
Tap on the '+' button to create a new book.
iCloud Sync.
At first launch, Noteflow shows you the books stored on your local device.
Files stored at this location are not automatically synched to iCloud or across devices.
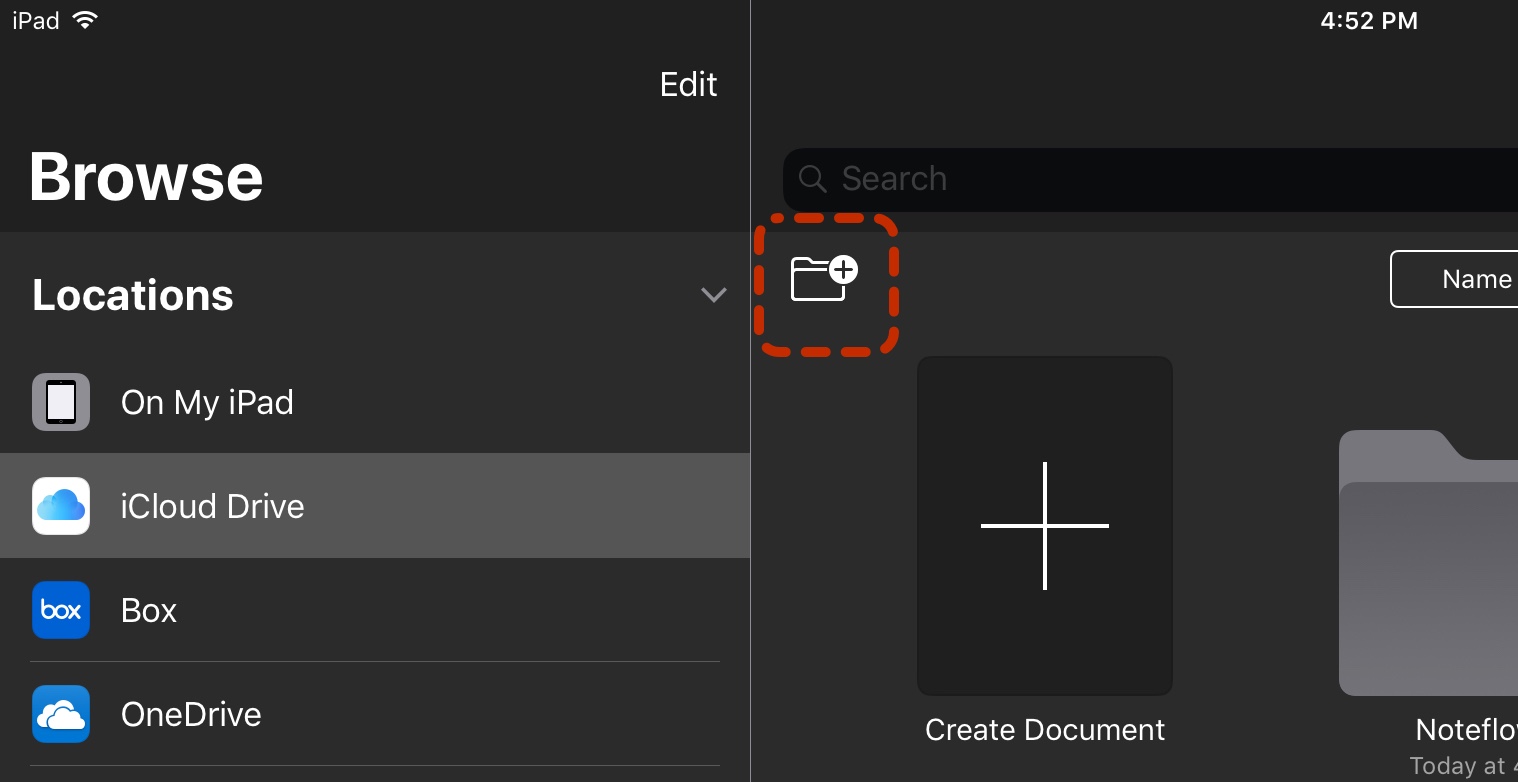
To take advantage of iCloud's backup and auto-sync features, simply create your files in iCloud drive or other installed storage provders:
- Enable iCloud on your device if you haven't already.
- Tap on the "Locations" section in the left sidebar to expand it, then select iCloud Drive.
- Scroll up the file list to reveal the "Create Folder" button at the left, and tap on it.
- Give it a name (e.g. "Noteflow").
- Open the new folder, and tap "Create Document" to create a new file in iCloud.
You can also drag and drop files from one location to another.
No live file merge.
Cloud sync is designed to support a single person editing files on different devices at different times.
In general, don't edit the same file on multiple devices at the same time.
Simultaneous remote edits can result in some changes being lost.
Renaming and deleting books.
Long-press on a book to show additional operations.
The Editor
Pan and zoom around the page with two fingers.
 Pan Mode.
By default, the Editor starts in Pan (reading) Mode.
Pan with one finger, and zoom with two.
Pan Mode.
By default, the Editor starts in Pan (reading) Mode.
Pan with one finger, and zoom with two.
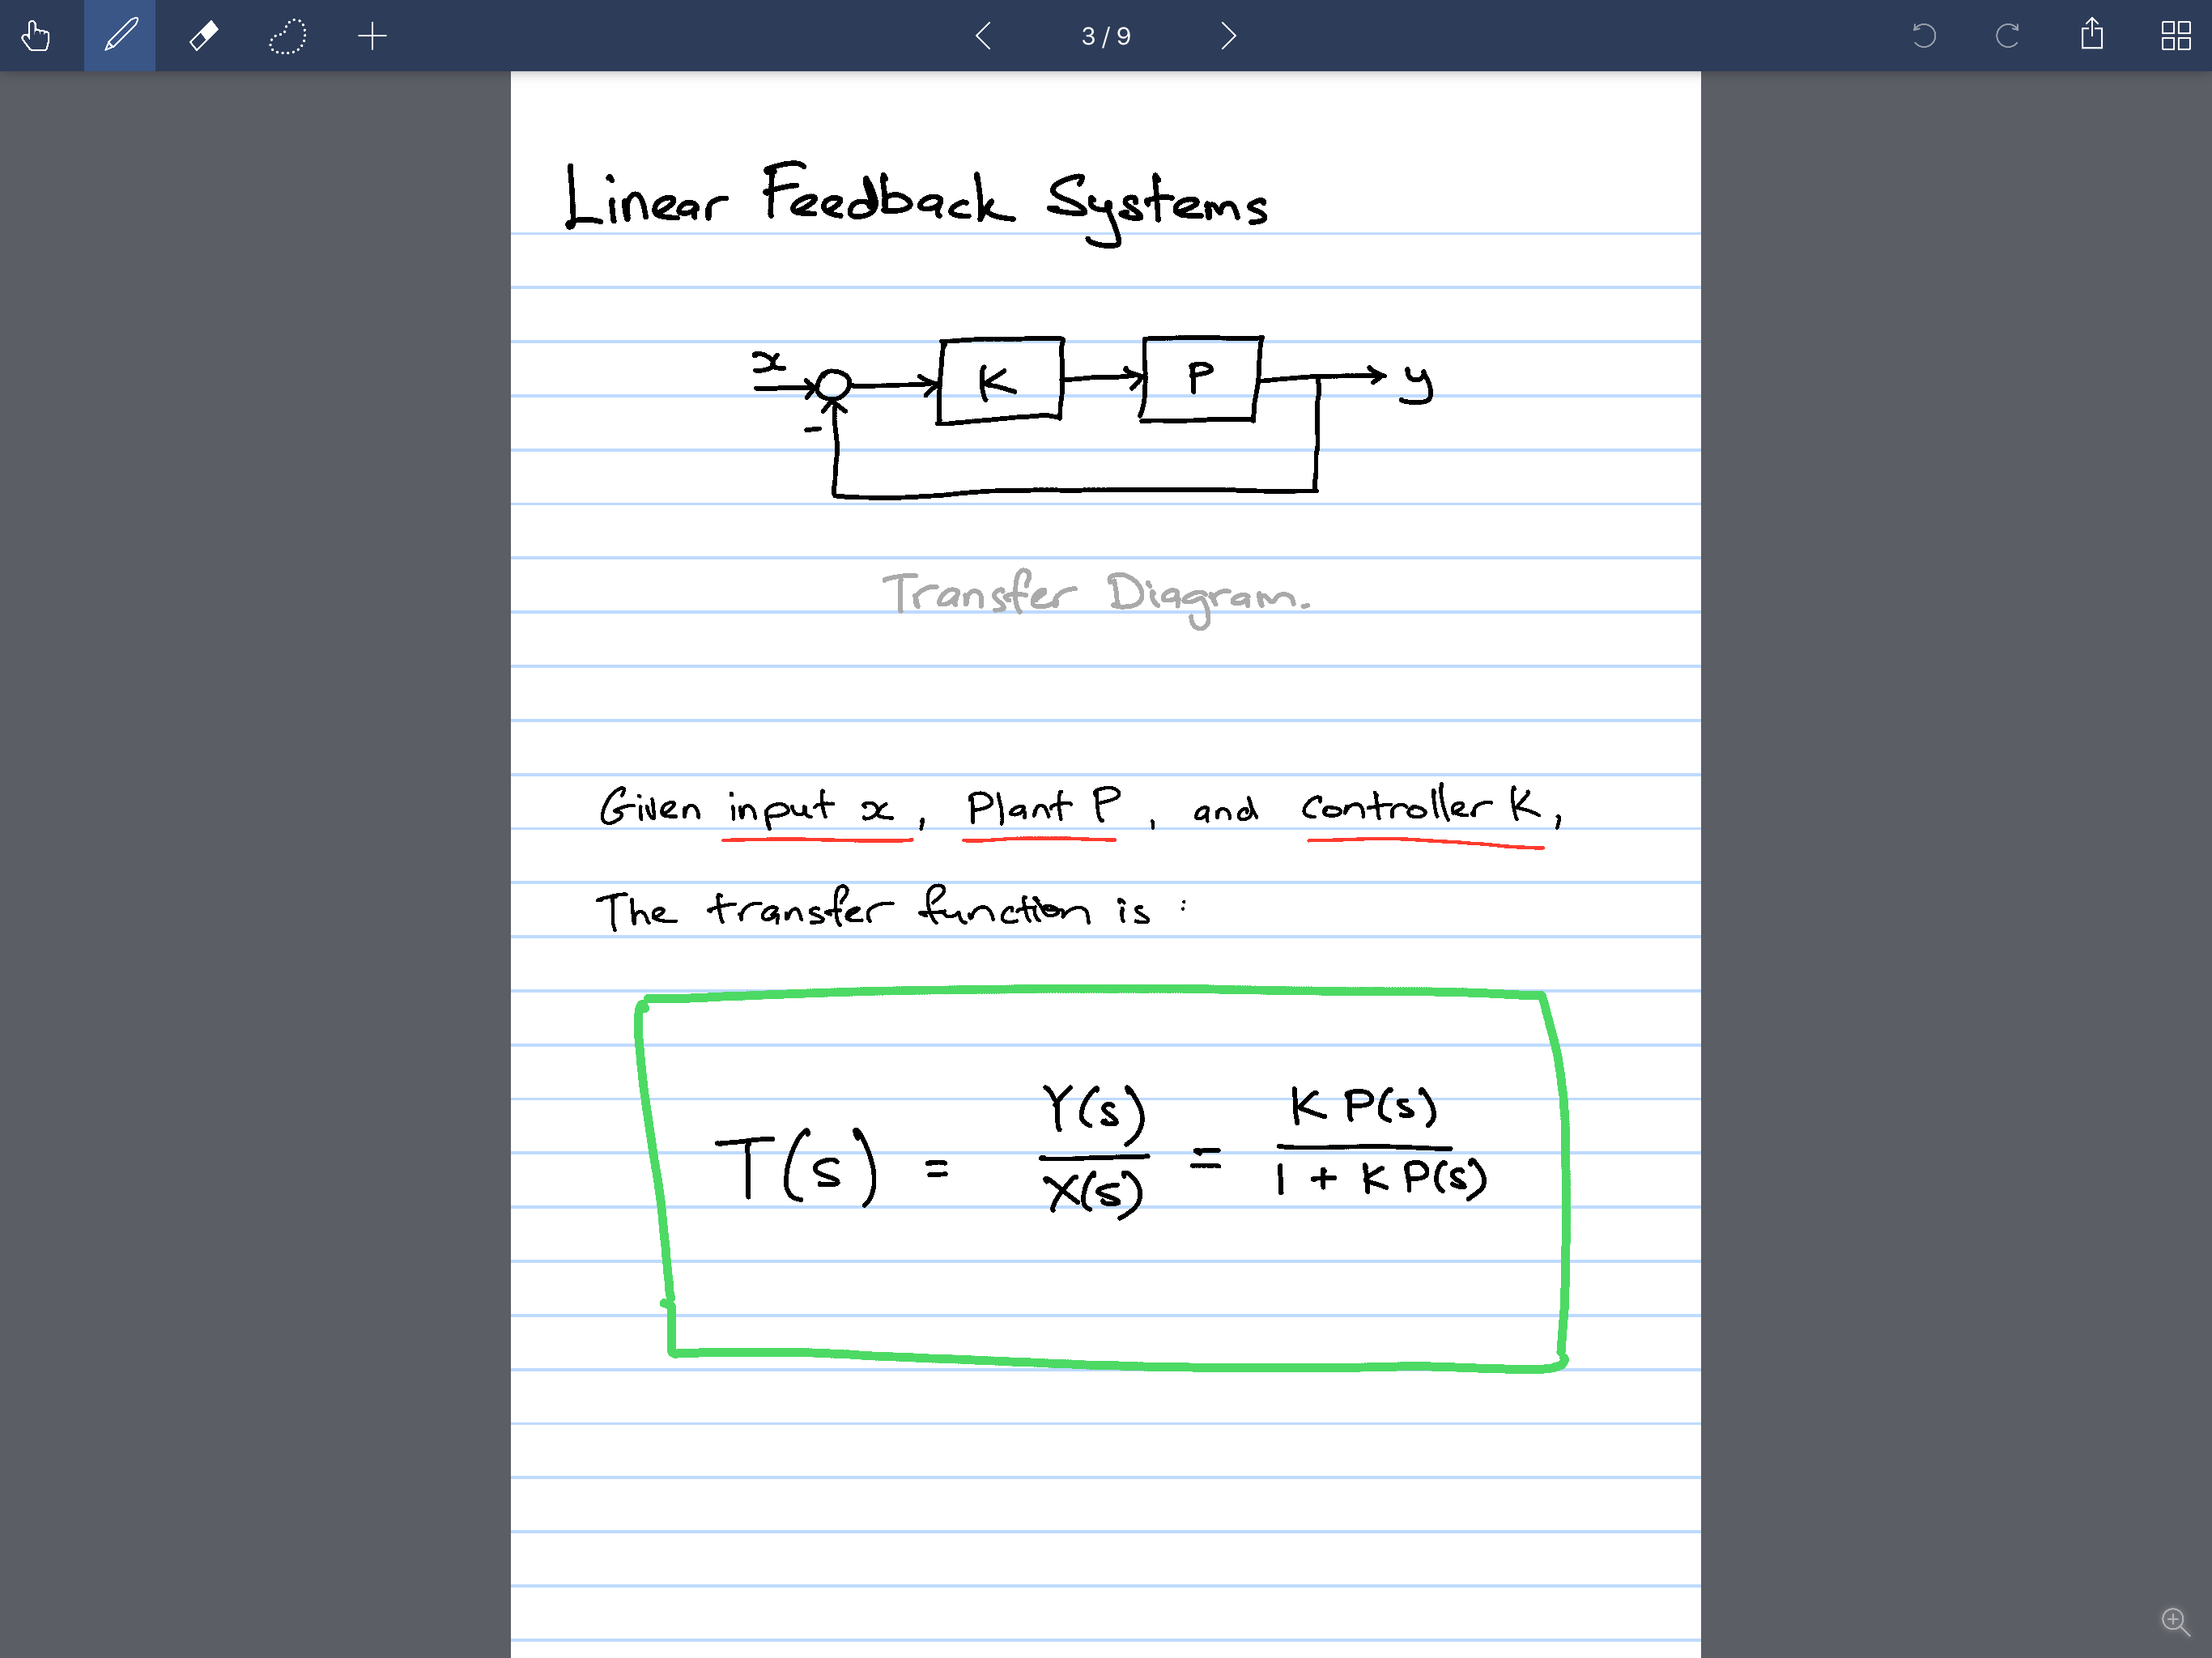
 Draw Mode.
Tap on the pen icon to enter Draw Mode.
Draw with one finger, and pan / zoom with two.
Draw Mode.
Tap on the pen icon to enter Draw Mode.
Draw with one finger, and pan / zoom with two.
Tap on the pen icon again when it is selected to toggle the palette.
The Palette

The palette lets you change the active pen tool:
Fountain Pen.
The default pen is the fountain pen.
This is optimized for handwriting, and expressive sketches.
It has a varying width depending on the speed (and with an Apple Pencil, pressure) of your writing.
 Marker.
The marker produces a fixed-width line, analogous to a technical pen or whitebord marker.
It is useful for making diagrams, wireframes, and cartoons.
Marker.
The marker produces a fixed-width line, analogous to a technical pen or whitebord marker.
It is useful for making diagrams, wireframes, and cartoons.
 Highlighter.
The draw-behind highlighter draws behind existing ink.
Very handy for adding background splashes to call out particular elements, or adding shadows.
Highlighter.
The draw-behind highlighter draws behind existing ink.
Very handy for adding background splashes to call out particular elements, or adding shadows.
 Straight-Lines.
Use this tool to drag straight lines. Turn on Snap-to-Grid to line up the line end points.
Straight-Lines.
Use this tool to drag straight lines. Turn on Snap-to-Grid to line up the line end points.
 Shape-Recognizer.
Tap the Straight-Lines button when selected to toggle shape-recognizer mode.
Use this to draw perfect circles, triangles and rectangles.
Shape-Recognizer.
Tap the Straight-Lines button when selected to toggle shape-recognizer mode.
Use this to draw perfect circles, triangles and rectangles.
Tip: Turn on the grid stationery for easily laying out wireframes and diagrams.
Pen width.
Tap the pen width indicator to reveal the width slider.
Pen opacity.
Tap the opacity button ("100%") to reveal the opacity slider.
Change this to make the ink more transparent.
Custom Colors.
Tap on the selected color to customize it.
You can reset the color palette from the App Settings menu in the Gallery.
 Eraser Mode.
Tap on the Eraser icon to enter Eraser Mode.
Tap on the Eraser icon again when it is selected to clear the page.
Eraser Mode.
Tap on the Eraser icon to enter Eraser Mode.
Tap on the Eraser icon again when it is selected to clear the page.
Selecting and Editing Ink
Noteflow features vector ink that can be moved and resized without loss of resolution.
We've tuned the ink settings in Noteflow to be great for writing and sketching.
 Selection Mode.
Tap on the Selection button to enter Selection Mode.
Lasso to select ink and other elements.
Selection Mode.
Tap on the Selection button to enter Selection Mode.
Lasso to select ink and other elements.
Drag the selection to move the ink.
Drag the round rotation grip at the top of the selection to rotate ink.
Drag the resize grip in the bottom right of the selection to resize it.
You can also move, resize, and rotate ink by dragging the selection with two fingers.
 Select-Filter.
In Selection Mode, the Select-Filter controls appear at the bottom left of the screen.
Use this to toggle selecting ink, text, and/or photos.
Select-Filter.
In Selection Mode, the Select-Filter controls appear at the bottom left of the screen.
Use this to toggle selecting ink, text, and/or photos.
This is handy for only working with one type of element at a time, for example, to resposition annotations on top of a photo.
Color-Select.
When you select ink of more than one color, the list of selected colors appear at the bottom left.
Think of this as a simple layer system.
By default, ink of all colors are selected, but you can tap on one or more colors to select just those colors.
Tap the All-Colors button at the top to toggle selecting all colors.
This is handy to move or delete ink that's behind, without disturbing the foreground.
Use this to change highlights or shadows.
Copy, Cut, and Paste.
Once you've selected some ink or other elements, tap inside the blue selection area to show ink edit options.
Tap copy or cut to copy the selected elements.
To paste, tap outside the blue selection area once to clear it, then tap again to show the paste option.
Recolor selected ink.
Select the recolor ink option to change the color of the selected ink.
Drag and Drop (iPad).
Noteflow supports iOS's native drag-and-drop system.
You can drag images and text from other apps and drop them into Noteflow.
You can also drag selected ink, text, and pictures from Noteflow to other apps:
first select the items to copy, then tap-and-hold on the selection until it pops up.
Drop the selection in other apps as an image.
Here's a quick video of drag-and-drop in action:
Page Management
Changing the Page.
Tap the page arrow buttons in the toolbar to change pages.
These arrows may not be visible on narrow (portrait) screens.
You can also flip through pages by swiping in Pan Mode.
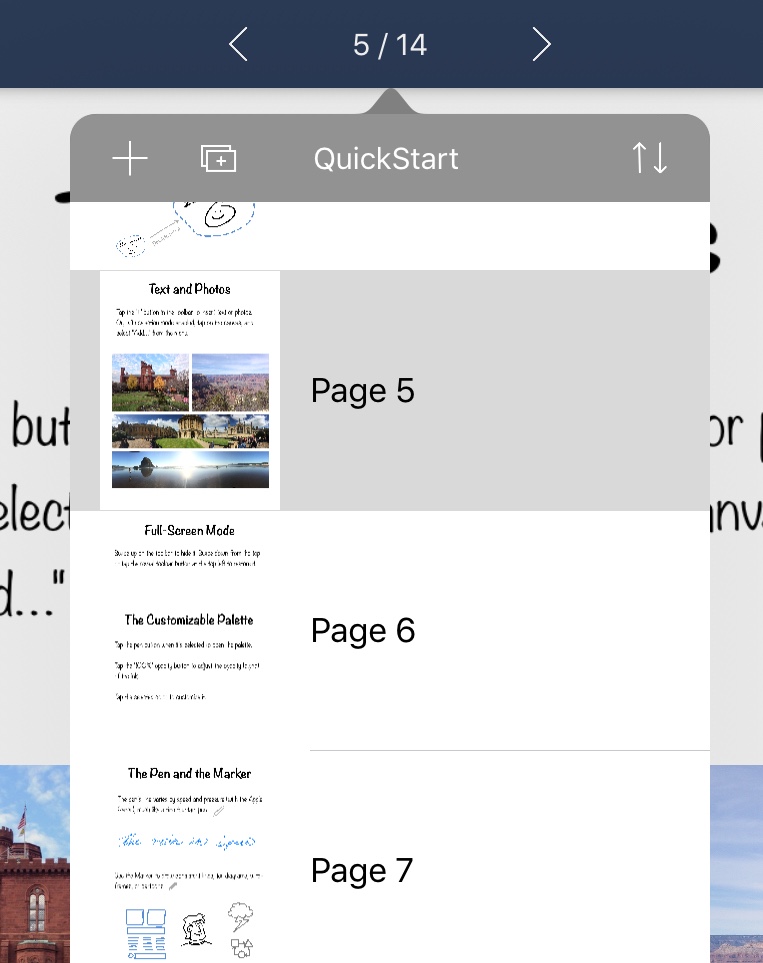
Tap on the page number at the top to open the Page Manager.
The Page Manager lets you quickly jump to a specific page.
Deleting Pages.
Swipe on a page to delete it.
Rearranging Pages.
Tap on the edit button at the right to rearrange pages.
Duplicating Pages.
Tap on the duplicate-page button to duplicate the current page.
Writing and Drawing
 Pencil-Only Drawing Mode.
If an Apple Pencil is connected, a Pencil icon will appear at the bottom left of the screen, next to the page-flip icon.
Tap this icon to toggle Pencil-Only Drawing Mode.
Pencil-Only Drawing Mode.
If an Apple Pencil is connected, a Pencil icon will appear at the bottom left of the screen, next to the page-flip icon.
Tap this icon to toggle Pencil-Only Drawing Mode.
When engaged, only the Pencil will be used for drawing, completely eliminating any stray marks from your palm or fingers.
You can still use your fingers for other operations such as zooming or erasing.
Hide Toolbar.
Drag the toolbar up to hide it, allowing you to use the full screen.
The lock screen can interfere with it being dragged back down, so you can also tap the reveal toolbar button at the top left to restore it.
 Focused Writing Mode.
Top the focused-writing icon at the bottom right of the screen to enter focused-writing mode.
Focused Writing Mode.
Top the focused-writing icon at the bottom right of the screen to enter focused-writing mode.
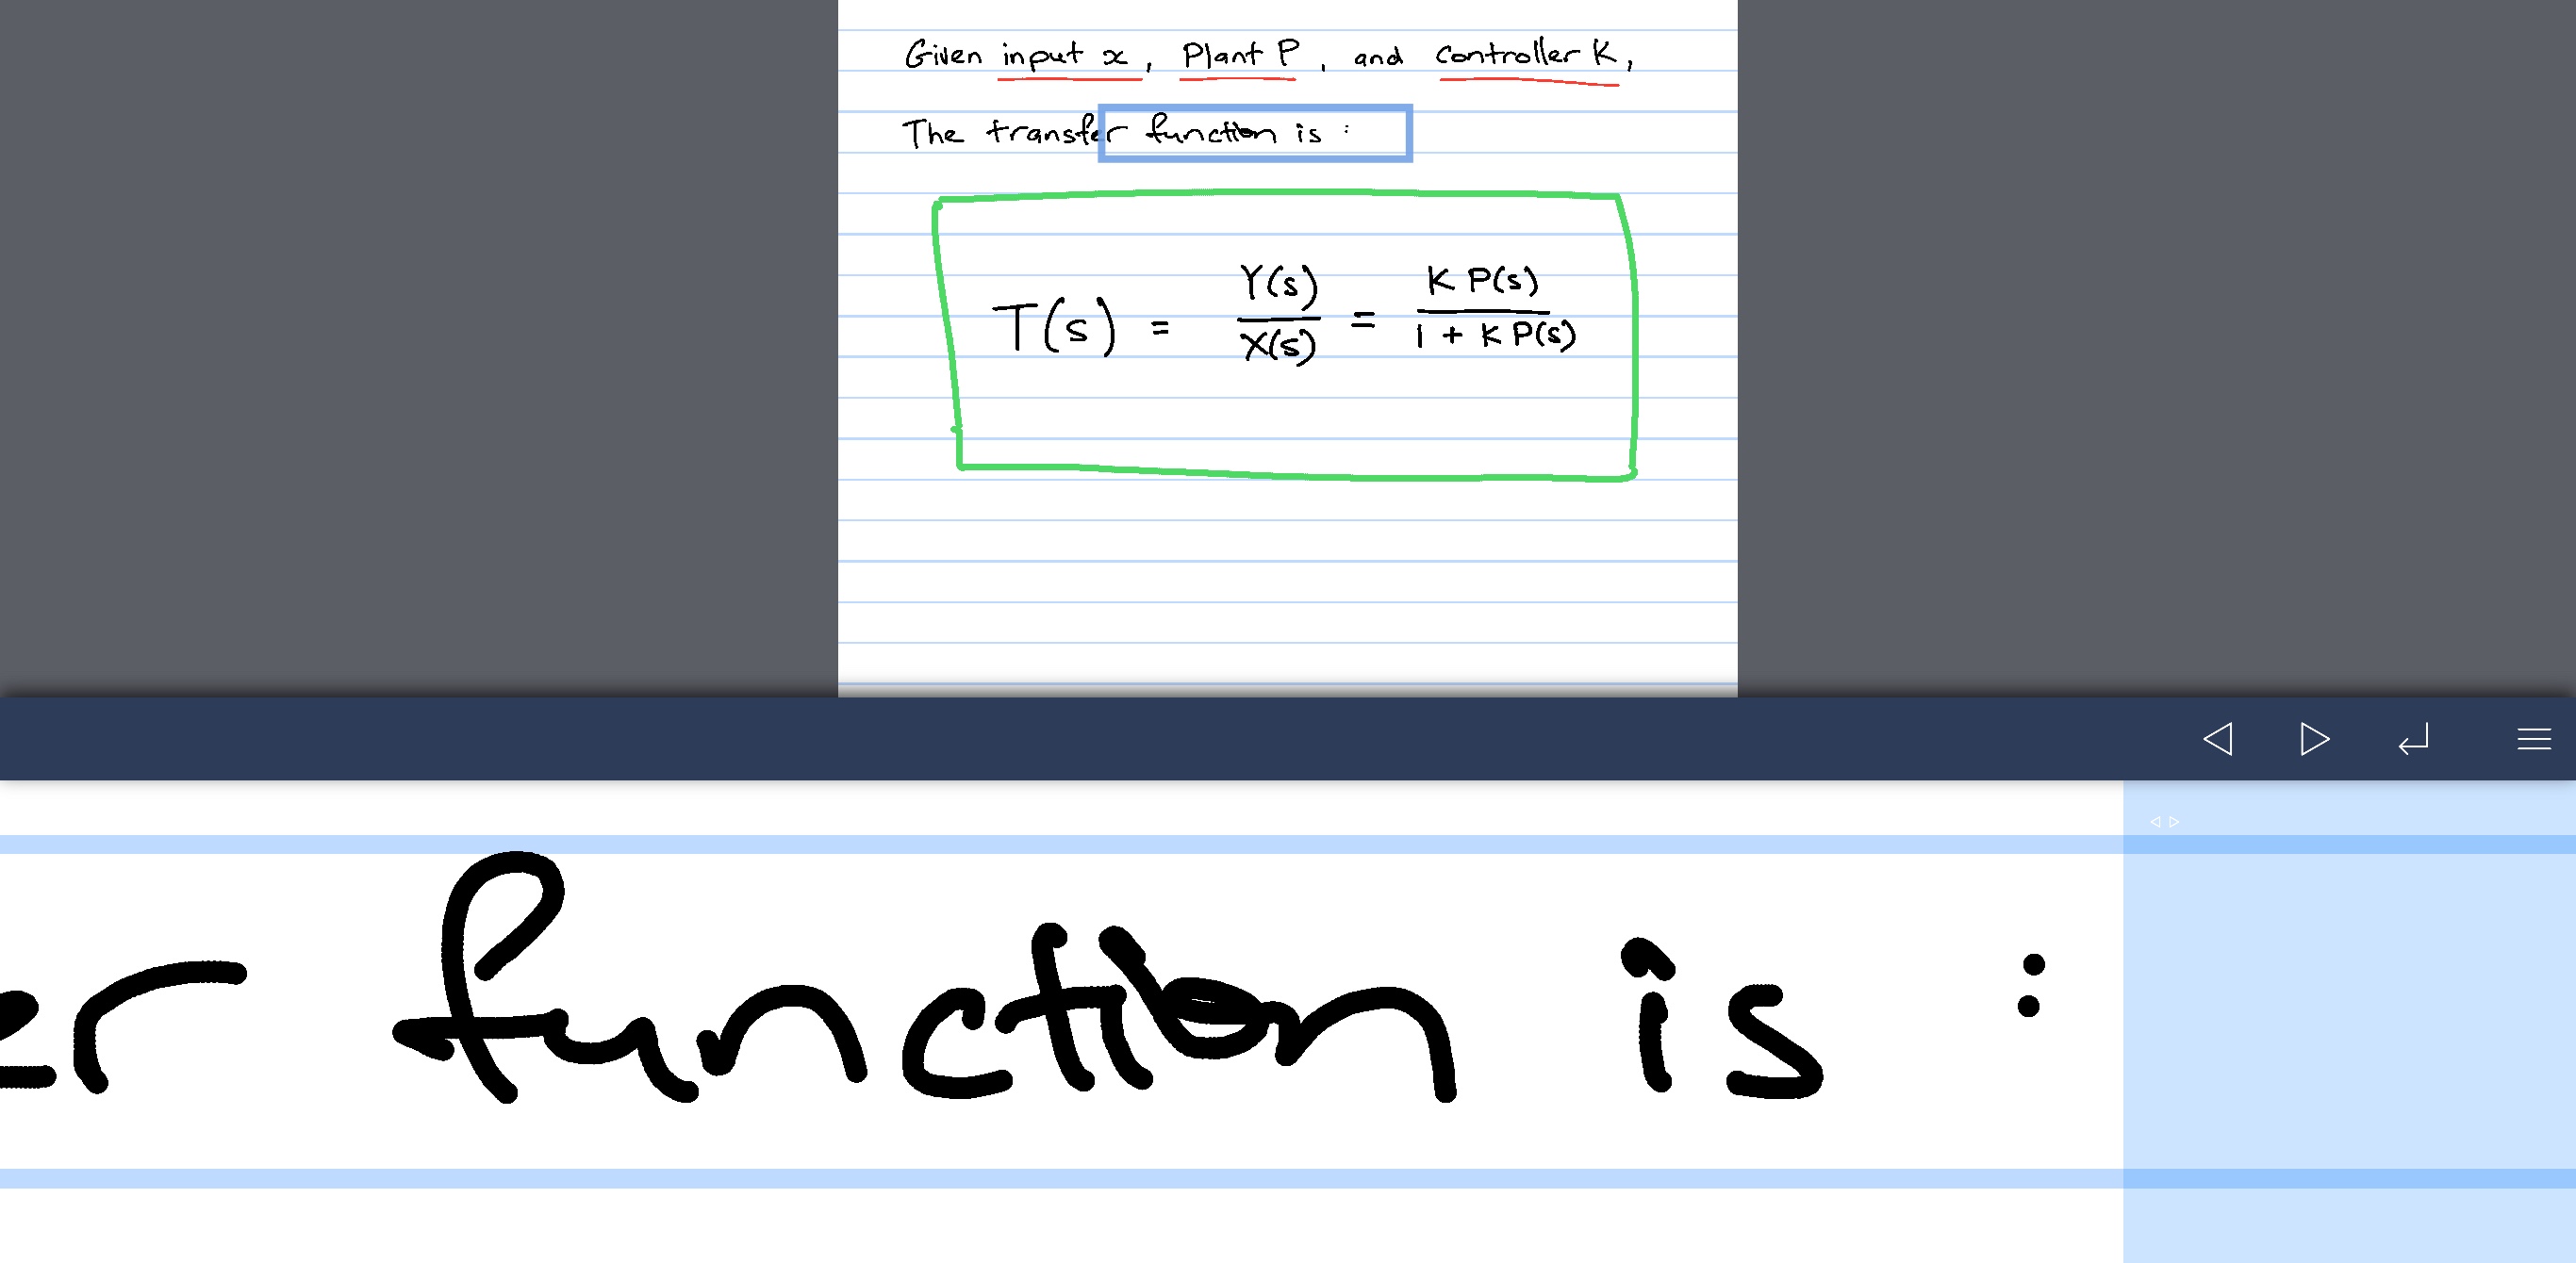
On an iPad, a zoomed-in writing area will appear at the bottom.
Use this to write larger and more legibly.
When you write or draw into the blue auto-advance zone, the screen will automatically scroll right after a brief delay.
You can also tap on the arrow and return buttons at the bottom of the auto-advance zone to manually shift the screen.
On an iPhone, the zoomed-writing area uses the whole screen.
Tip: Turn your phone to landscape, zoom all the way in, then use auto-advance to turn your phone into a writing tablet.
Pictures
Inserting Pictures.
Tap the Add button in the toolbar to insert a picture from the Photo Library or snap one using the camera.
On small screens, the Add menu is moved under the Settings Menu.
You can also access the Add menu by tapping on the canvas in Selection Mode and selecting Add.
Typing Text
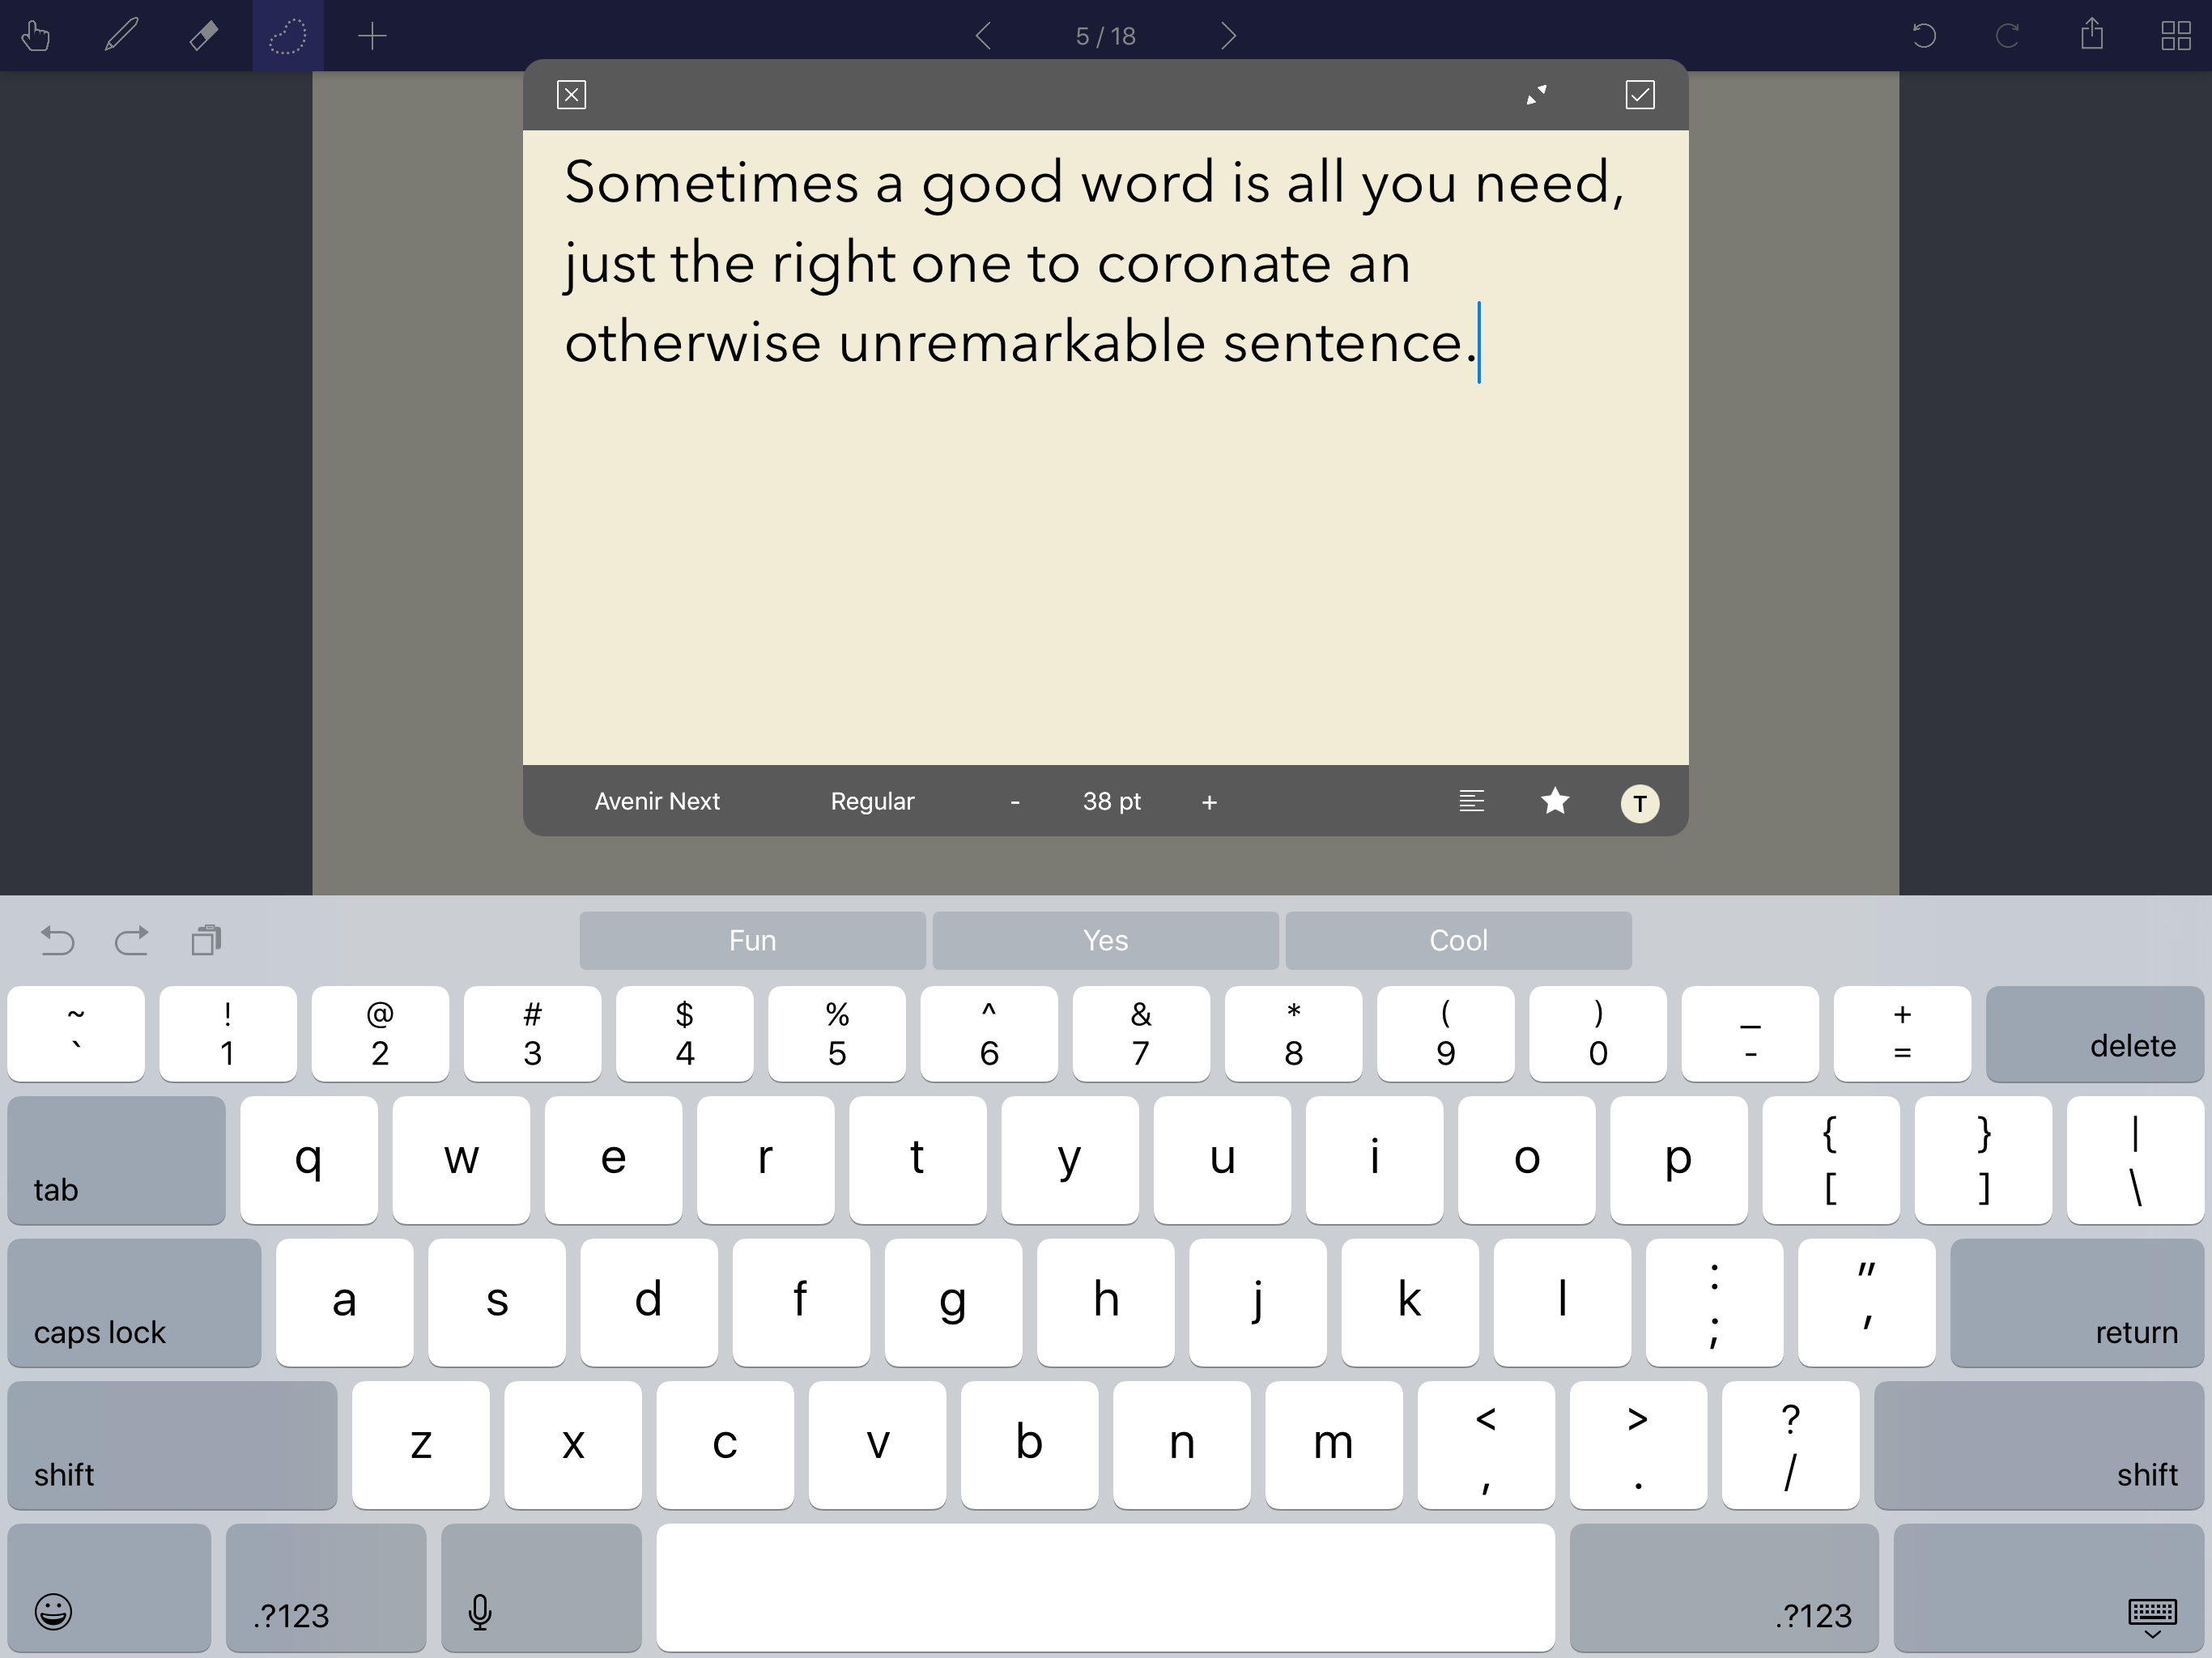
While you can write out all your notes and labels in longhand, you can also choose to type.
Tap on the add button and select Text to insert a new text box. This opens the text editor.
Text Color. Tap the T-in-a-circle icon to change the text color.
Default Style. Tap the Star icon to save the current text settings as the default style, or reset to the default style.
Full Screen. On an iPad, tap the zoom icon at the top right of the toolbar to toggle full-screen editing.
Keyboard Shortcuts
You can perform basic navigation and text operations with an attached hardware keyboard.
Press Cmd+Left or Right Arrow to change the page
Press Cmd+T to edit the first textbox on a page.
Cmd+Enter accepts your changes in the Text Editor.
Tip: Press and hold the Cmd key alone to see a list of keyboard shortcuts for that screen.
Inkport
Select Inkport from the Add menu to snap a picture and instantly convert it into vector ink.
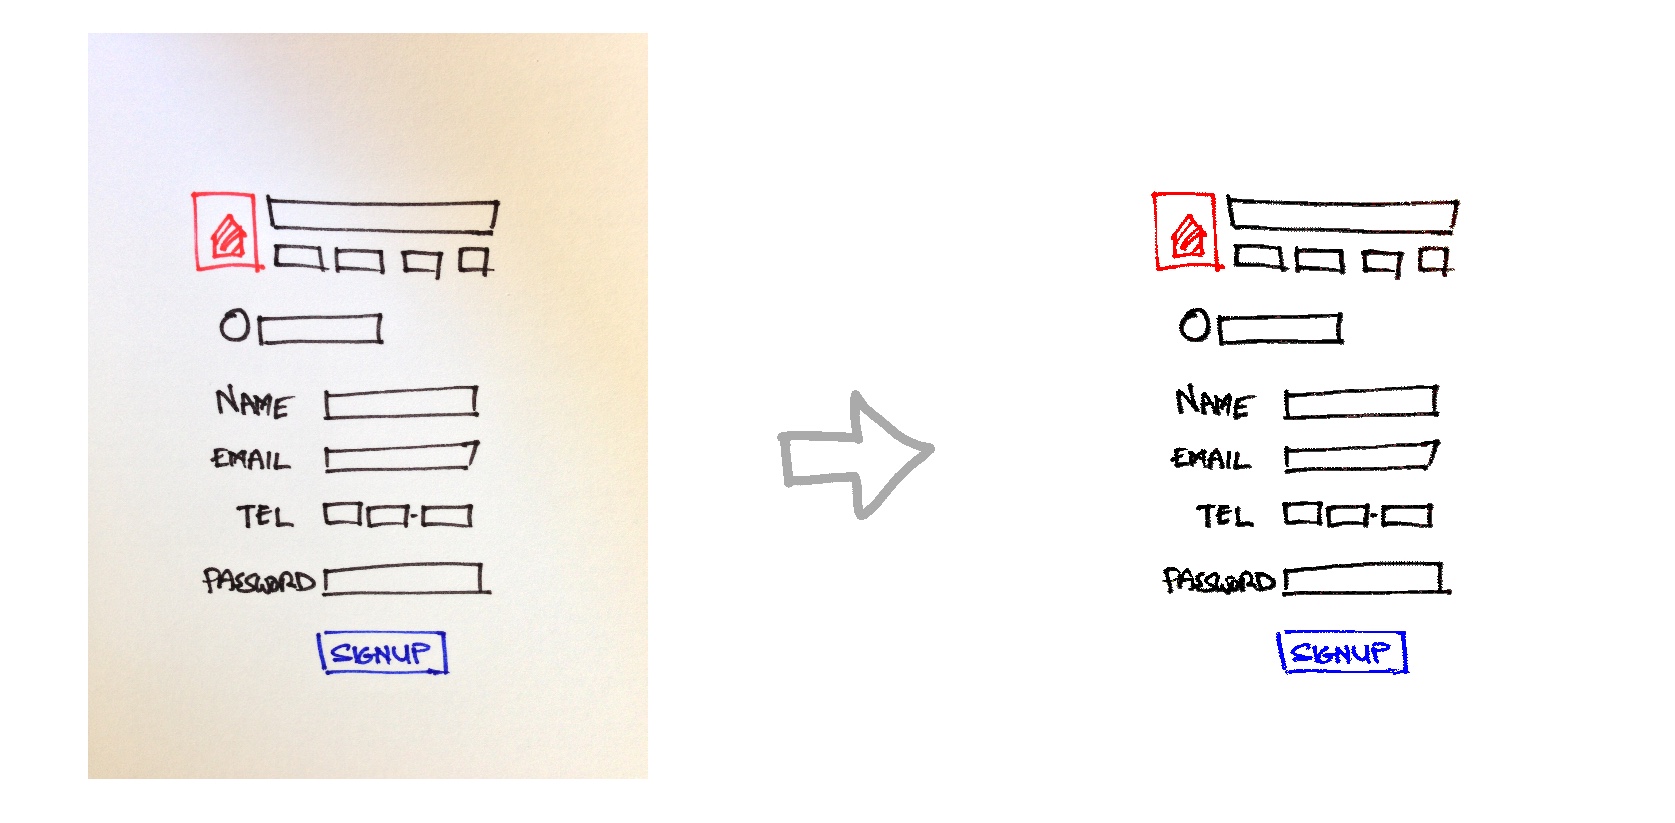
Inkport is optimized to capture writing and high-contrast line drawings, such as from a whitebord or marker art.
Inkport existing photos.
Tap on a picture on the page and select Inkport from the menu.
This provides an additional slider to control the sensitivity of the conversion process.
Removing unwanted lines.
After an Inkport, use Color-Select to pick the colors that you want to delete, then tap on the selection and delete them.
This is very handy for removing the rule lines from notebook paper, or other unwanted artifacts.
Here's a quick video of Inkport in action:
Import PDF Files
Select Import PDF from the Add menu and pick the PDF file to import.
It will be inserted after the current page.
Open a PDF file from the Gallery to import it as a new book.
You can also send a PDF file from another app via "open in..." to import into Noteflow.
Insert Calendar
Select Calendar from the Add menu to insert a monthly calendar.
You can insert a single month, or up to two years worth of pages.
This is handy for planning ahead, or to create a space for daily doodles and reflections.
Settings / Actions Menu
Tap the settings (gear) icon to show options to modify and share the book.
Themes.
Set the toolbar and background color for each book.
This is handy for providing a quick visual reminder which book or project you are working on.
Stationery.
You can change the page background color and ruling to one of the following:
- Blank
- Narrow lines
- Wide lines
- Grid
- Dot Grid
When a new page is added, it uses the stationery settings of the last page in the book.
Page Size.
Use this to change the size of the page to either landscape, portrait, or square.
You can also directly enter the dimensions in pixels. These are relative to each other, only the ratio matters.
Import PDF.
Pick a PDF file to insert after the current page.
Export.
You can export the current book to the following formats:
- Editable Noteflow File
- PDF
- JPEG
Tip: Export to a PDF and select Print from the action menu in the Quicklook Preview to send it to an Air Print printer.
Snap to Grid.
This toggle applies to selected text and images, and is handy for laying them out exactly on the page.
Rotate Selection.
This toggles rotation when resizing the selection with two fingers.
Drag and Drop Selection.
By default, tap and hold on the selection to start dragging it to other apps.
However, this can get in the way when you are trying to accurately position elements.
Use this toggle to diable the tap-and-hold to drag behavior.
You can still drop images and text from other apps into Noteflow.
Importing Books from Inkflow
You can import all your work from Inkflow into Noteflow and pick up where you left off.
Imported files are stored in the local Noteflow folder on your device.
You can move them to iCloud or elsewhere after importing them.
To import from Inkflow:
- Open a book in the Inkflow App.
- Select Export from the Settings menu.
- Pick the Inkflow format, then select Noteflow from the list of apps.
If you've copied your Inkflow files to iCloud, you can import them via the Files App:
- Open the Files App.
- Tap and hold on an Inkflow file.
- Tap Share from the menu, and pick Noteflow.
Importing Cards from Cardflow
You can similarly import files from Cardflow.
Note that not all elements can be imported.
Cards are converted into pages (with a separate page for the back of a card).
Only ink, images, and text are transferred.
Card templates, web pages, links, and board drawings can't be imported.
To import from Cardflow:
- Open the Cardflow App.
- Tap on the name of a file and select Export / Transfer.
- Select Noteflow from the list of apps.
Transferring Books to Noteflow+
To transfer a book from Noteflow to Noteflow+:
- First make sure both Noteflow and Noteflow+ are installed.
- Open the iOS Files App.
- Navigate to the Noteflow folder on your device.
- Tap the Select button, then Select All.
- Tap Move.
- Select the Noteflow+ folder (or a folder in iCloud).
IMPORTANT:
Do not delete Noteflow until you have copied any files you wish to keep.
Deleting an app will delete all of its files stored in its folder on your device.
Back to the Noteflow homepage.