 Cardflow User's Guide
Thanks for downloading Cardflow!
There are many advanced and subtle features to discover.
Bookmark this page as a handy reference.
Cardflow vs. Cardflow+
Note: The Standard Edition of Cardflow has a subset of the features listed here.
Open the special document named "Try Cardflow+" in the App for a list of the differences.
The additional features in Cardflow+ include:
- Cloud sync
- The ability to draw directly on the board
- Card Links
- Draw behind mode
- Inserting photos and web pages on cards
- Shape recognizer
- Fully customizable color palette
- Export to PDF, text, CSV, and OPML
- Full text search
- Color-select and recolor ink
- And more.
The Gallery
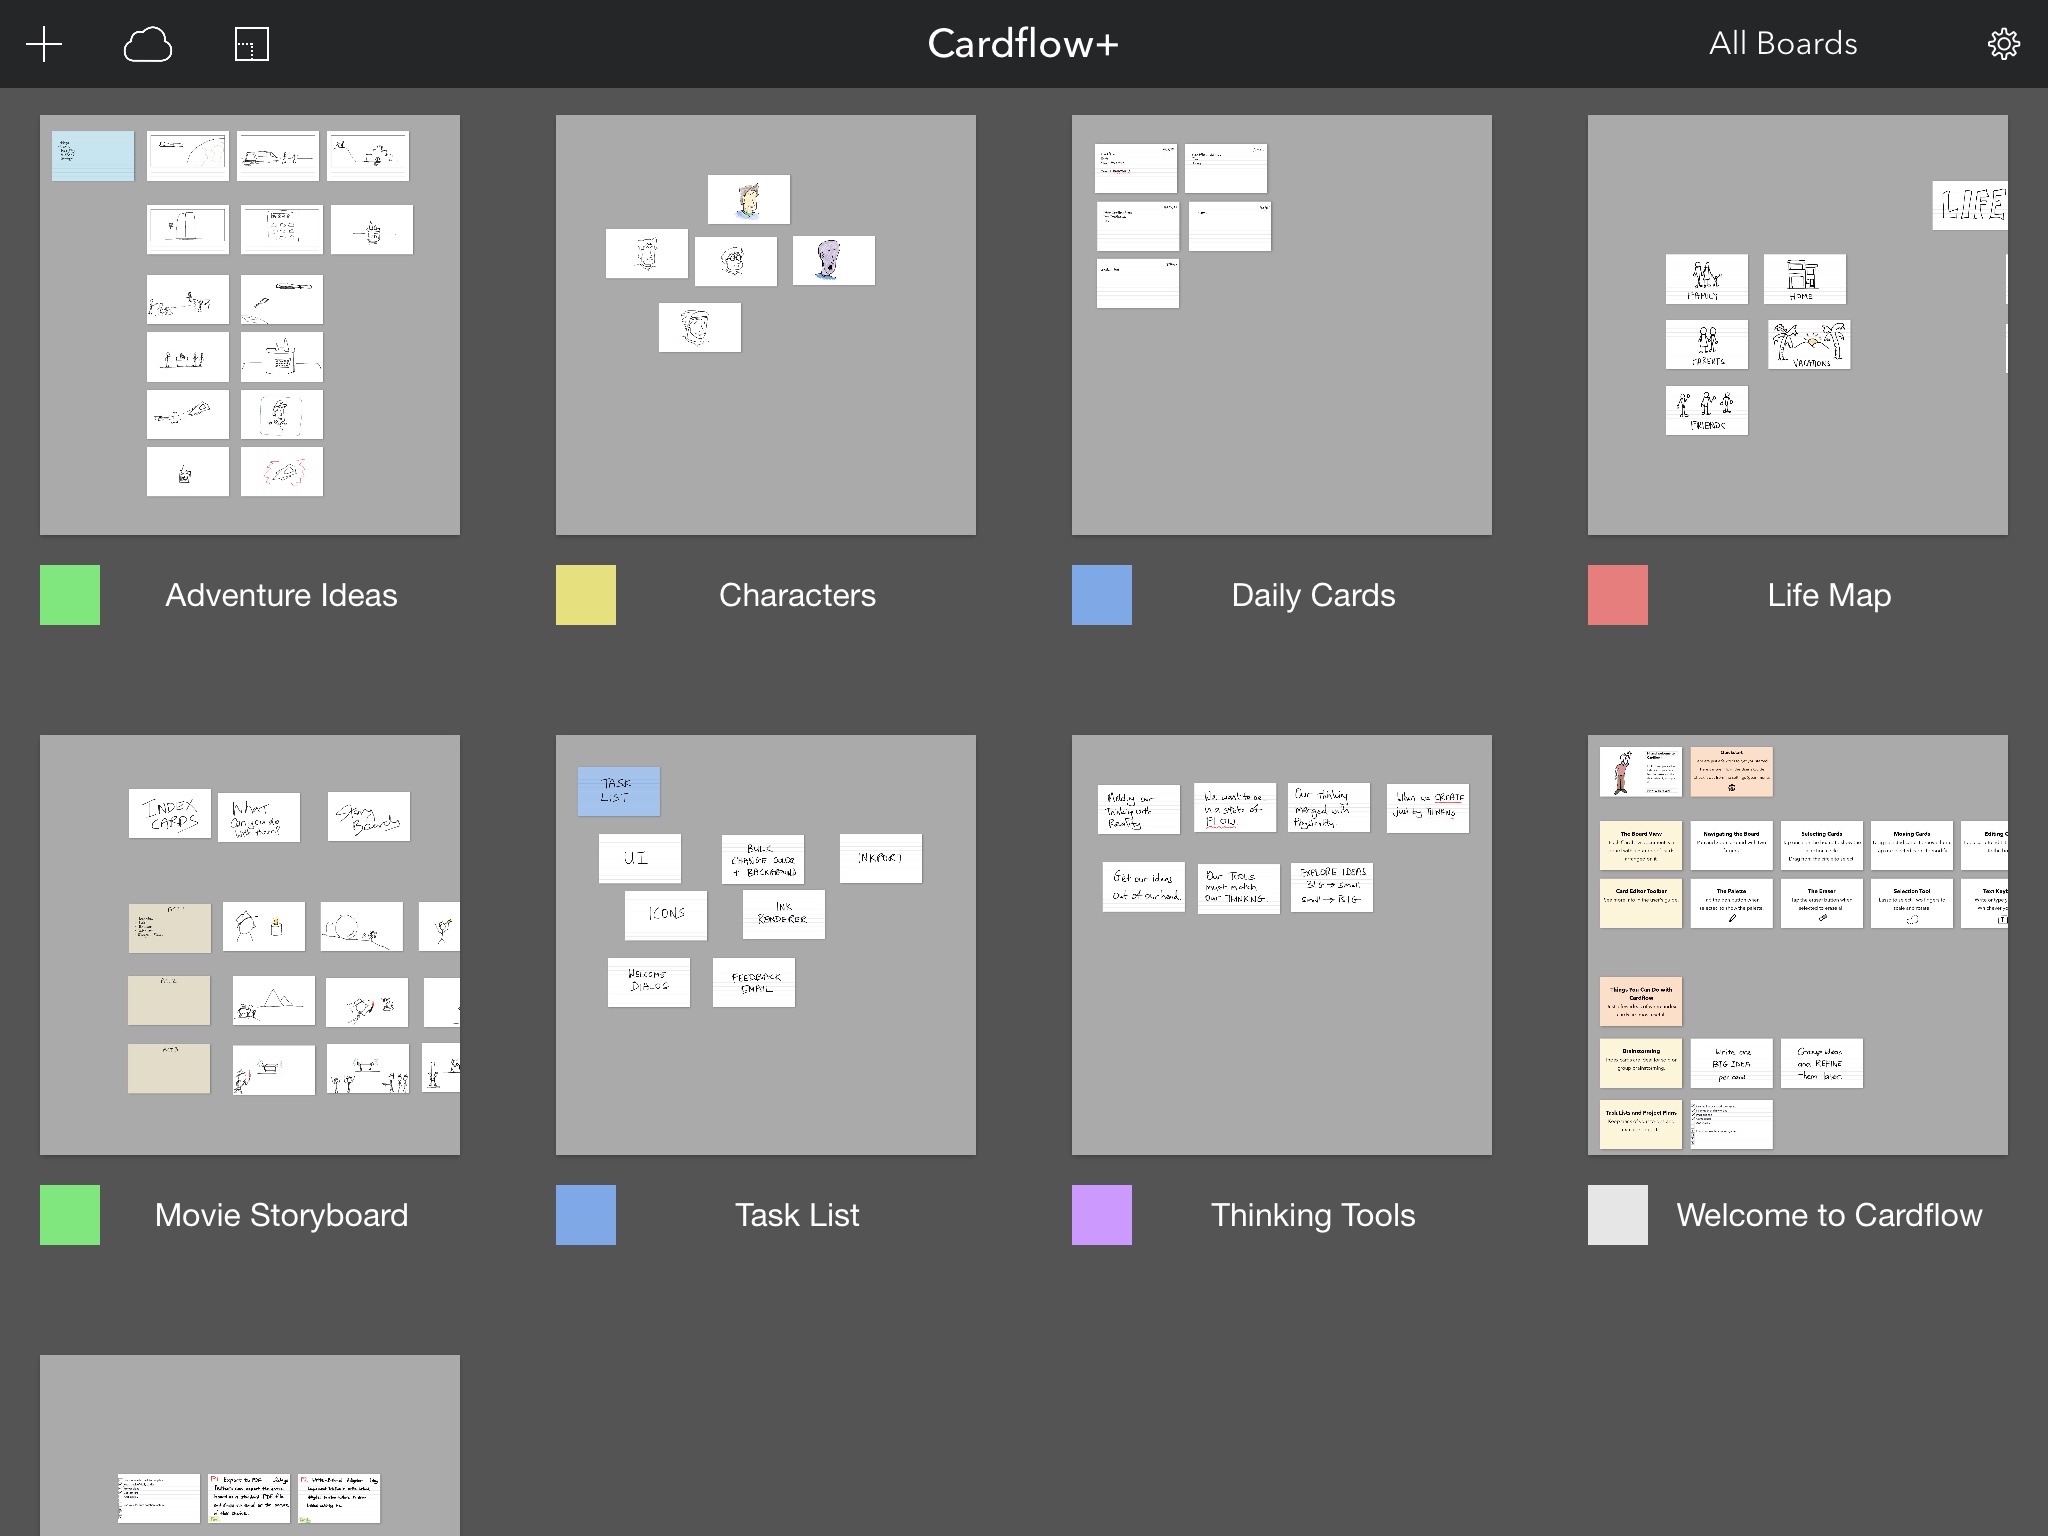
Cardflow opens to a list of available boards (files).
Tap on a board to open it.
Sort and Search.
Scroll up to see the sort and search controls.
Type in a partial name to show matching boards.
Creating new Boards.
Tap on the '+' icon in the top left to create a new board.
All boards are first created locally on your iPad.
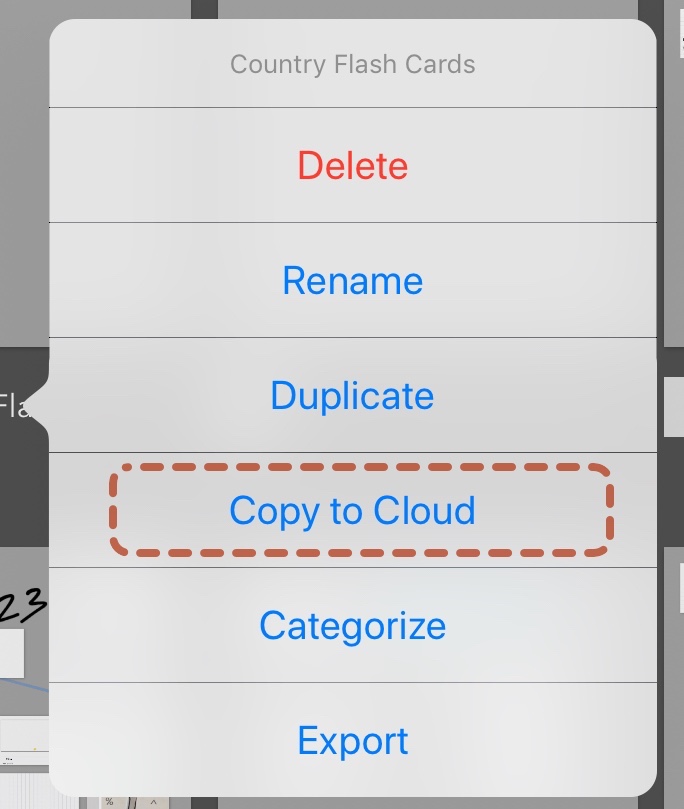
Copy Boards to the Cloud (Cardflow+ and iOS 11+).
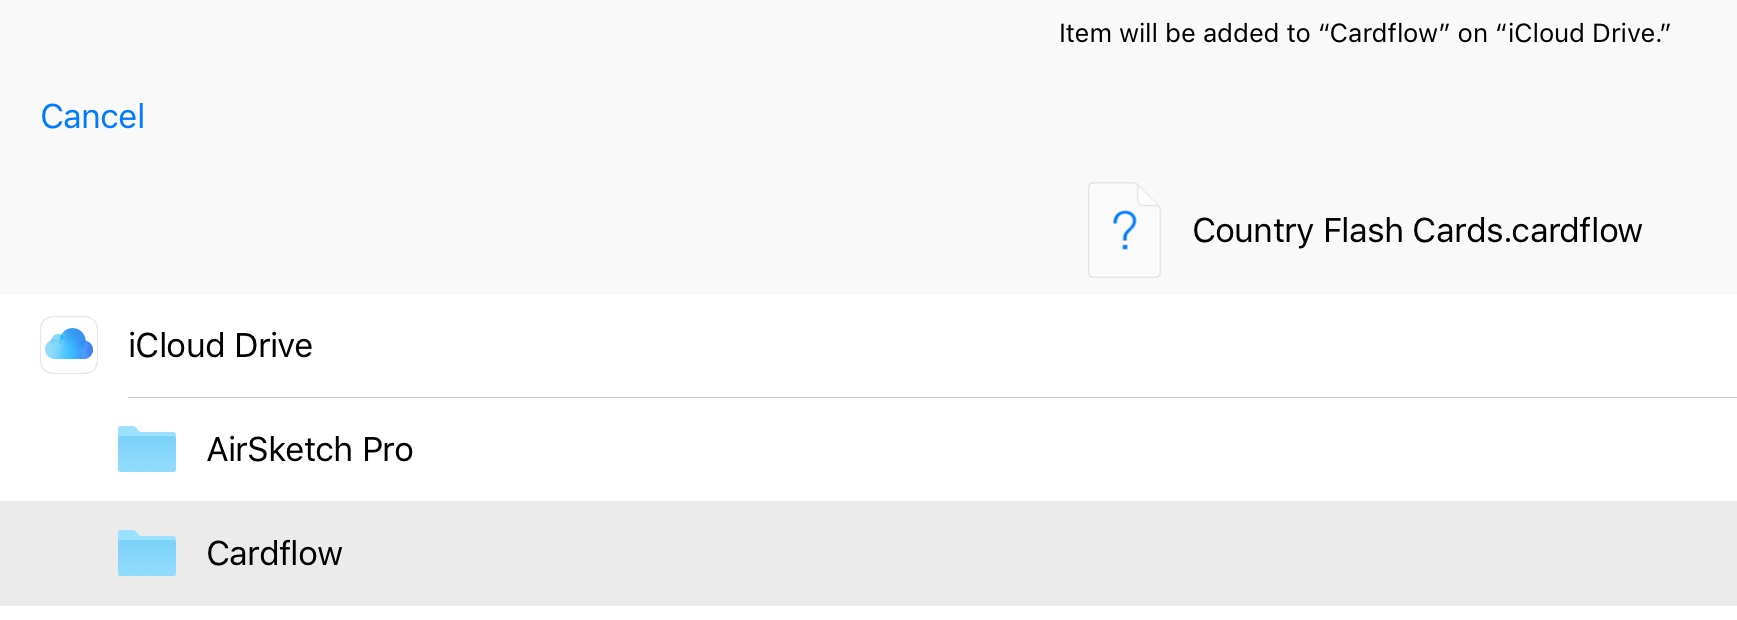
Tap on a board's name, then tap "Copy to Cloud".
Choose where to store it in iCloud, or on a 3rd party service.
See more details below.
Open from Cloud (Cardflow+ and iOS 11+).
Tap on the cloud icon in the toolbar to open a board stored in the cloud.
The changes you make will be auto-saved back to that location.
Icon sizes.
Tap the icon size button to toggle the board icon sizes.
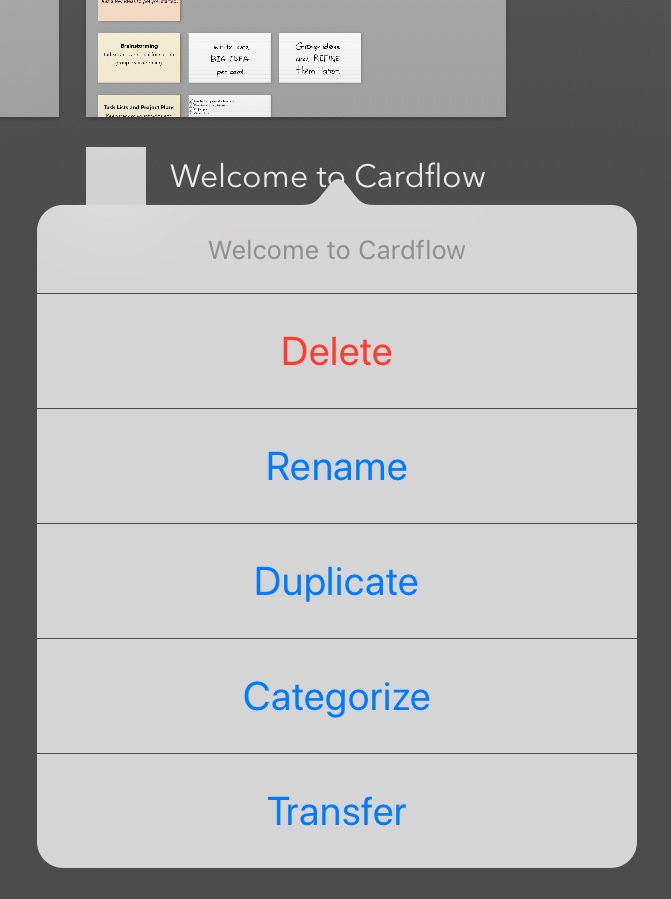
Renaming and deleting boards.
Tap on the board name, or long-press on a board, to show additional operations.
Color-coded Categories.
Each board can be tagged with a category.
Tap on the color tab to the left of the file name to set its category.
Tap on the "All Files" button in the toolbar to filter files by specific categories.
Customize Category Names.
Prefer something more evocative than "Category A"?
Tap on the gear icon to customize their name and access additional App Settings.
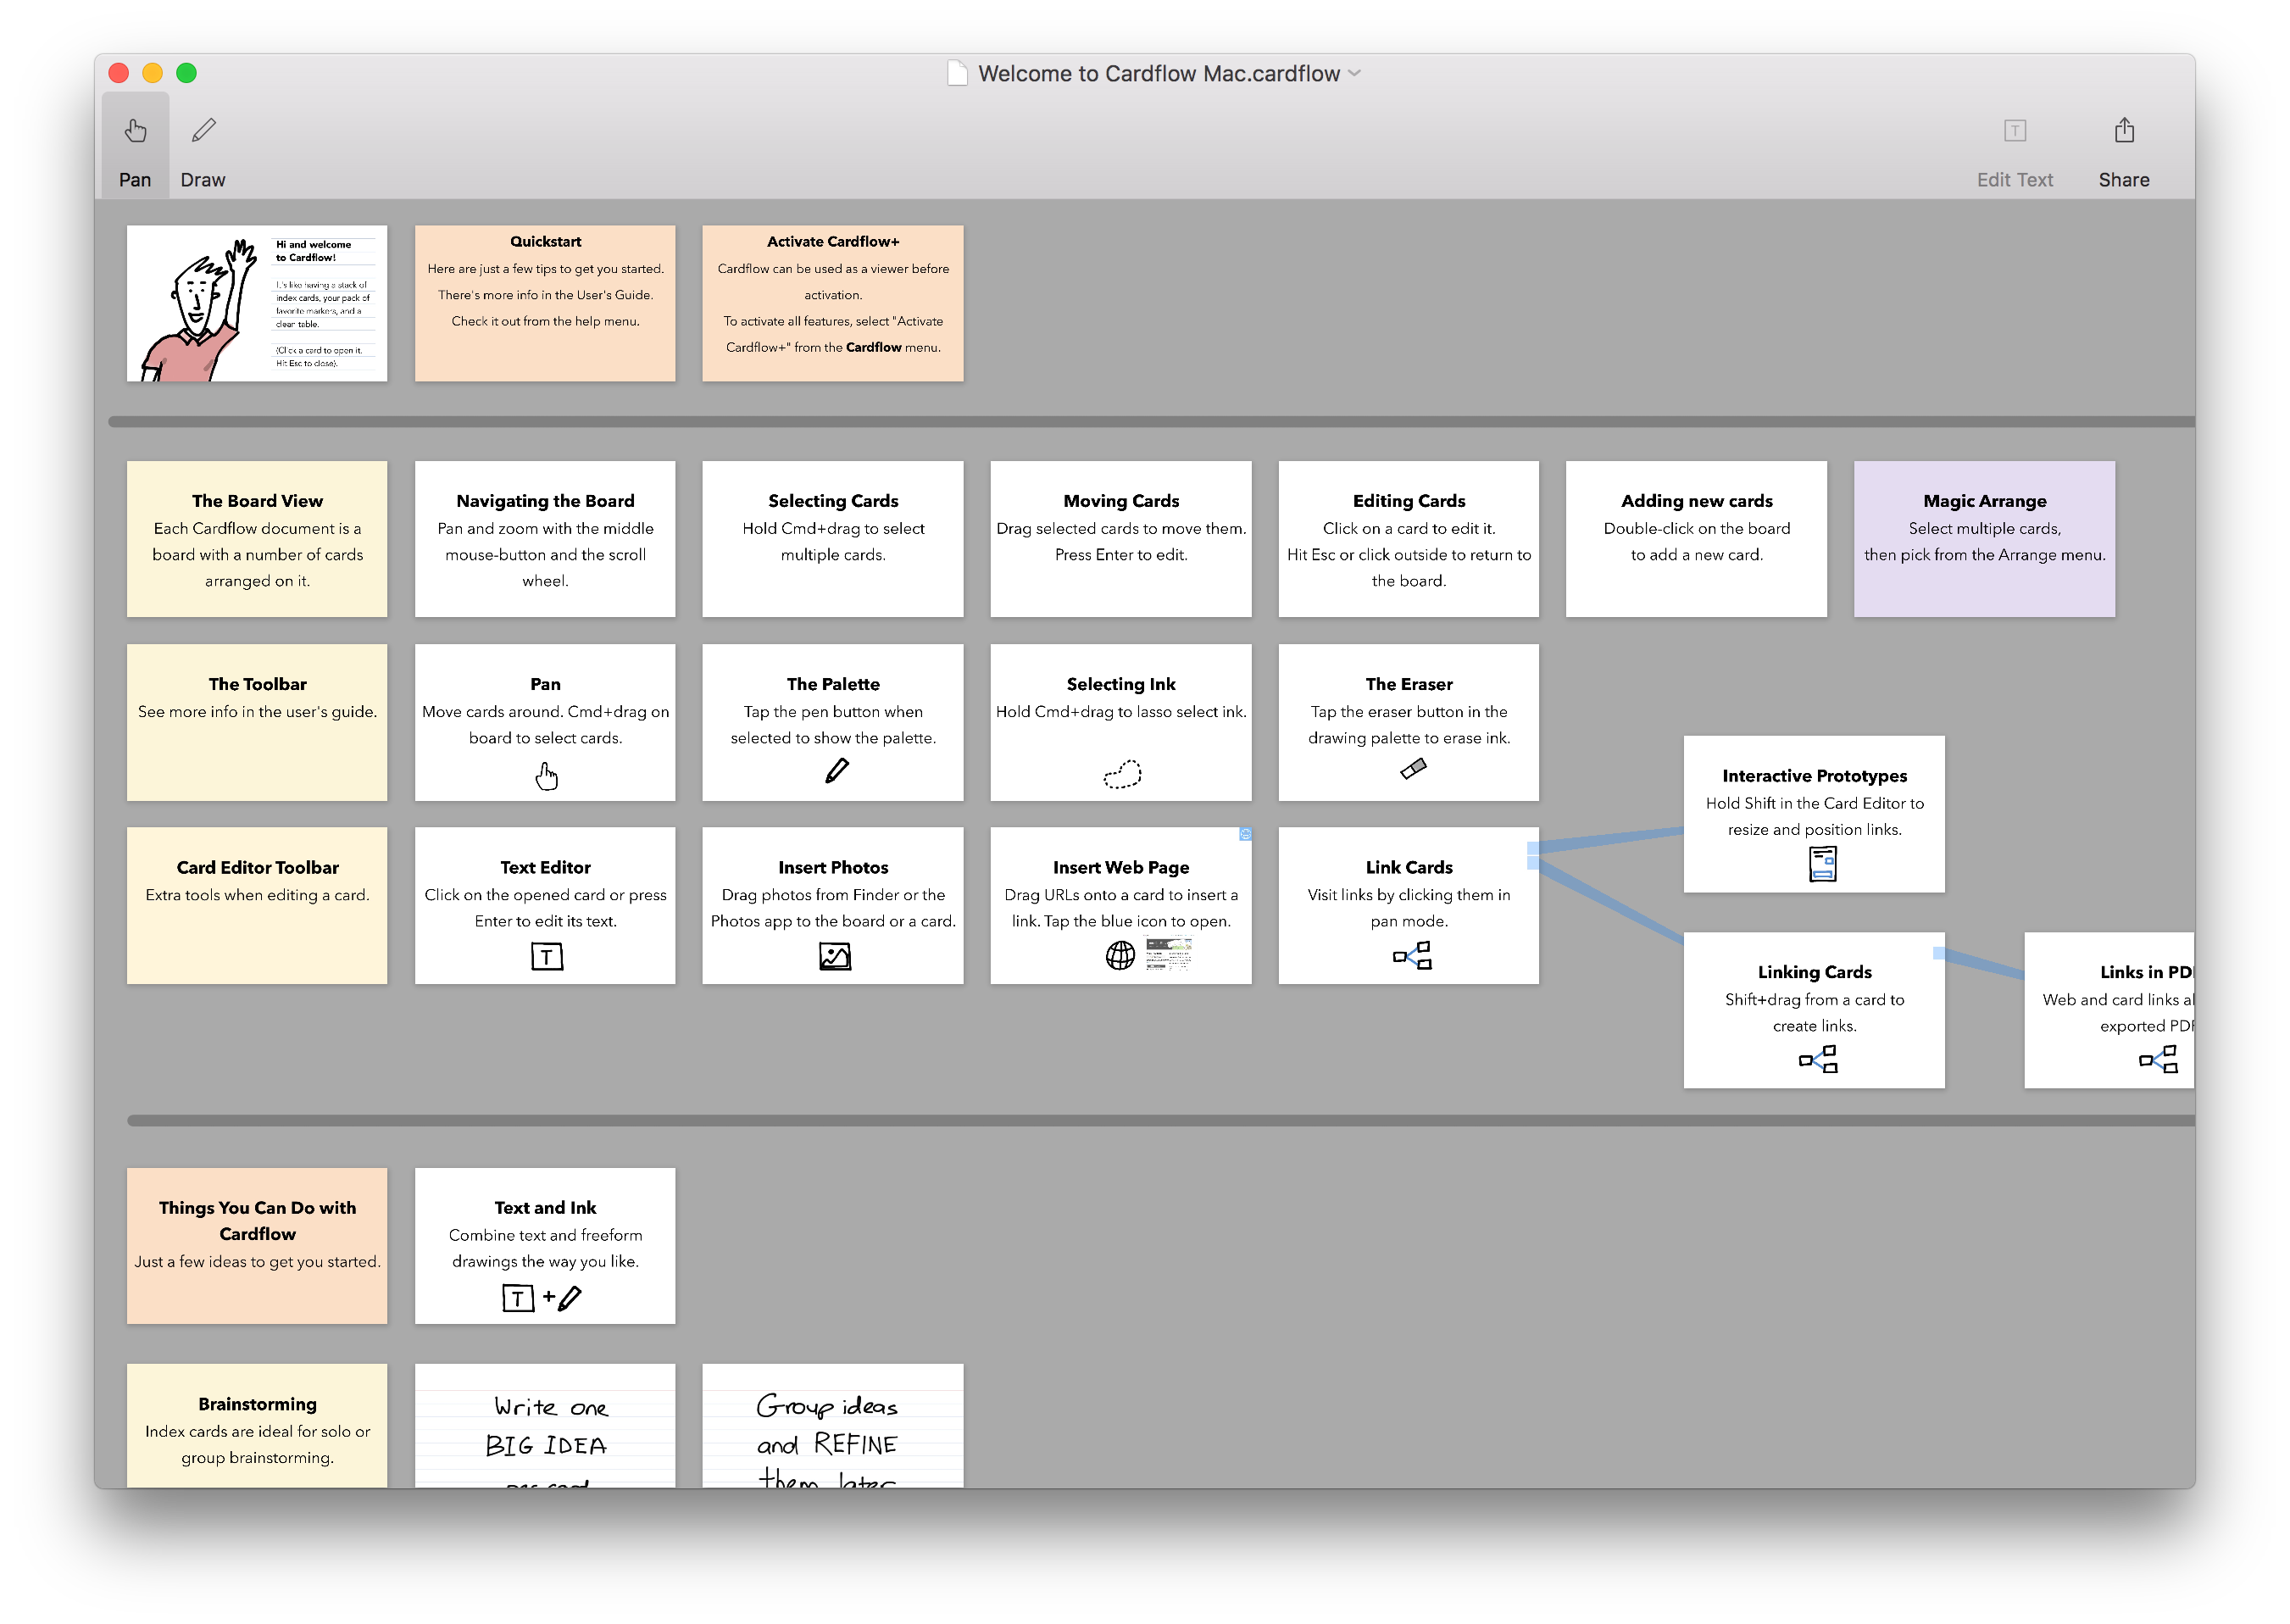
The Board Editor
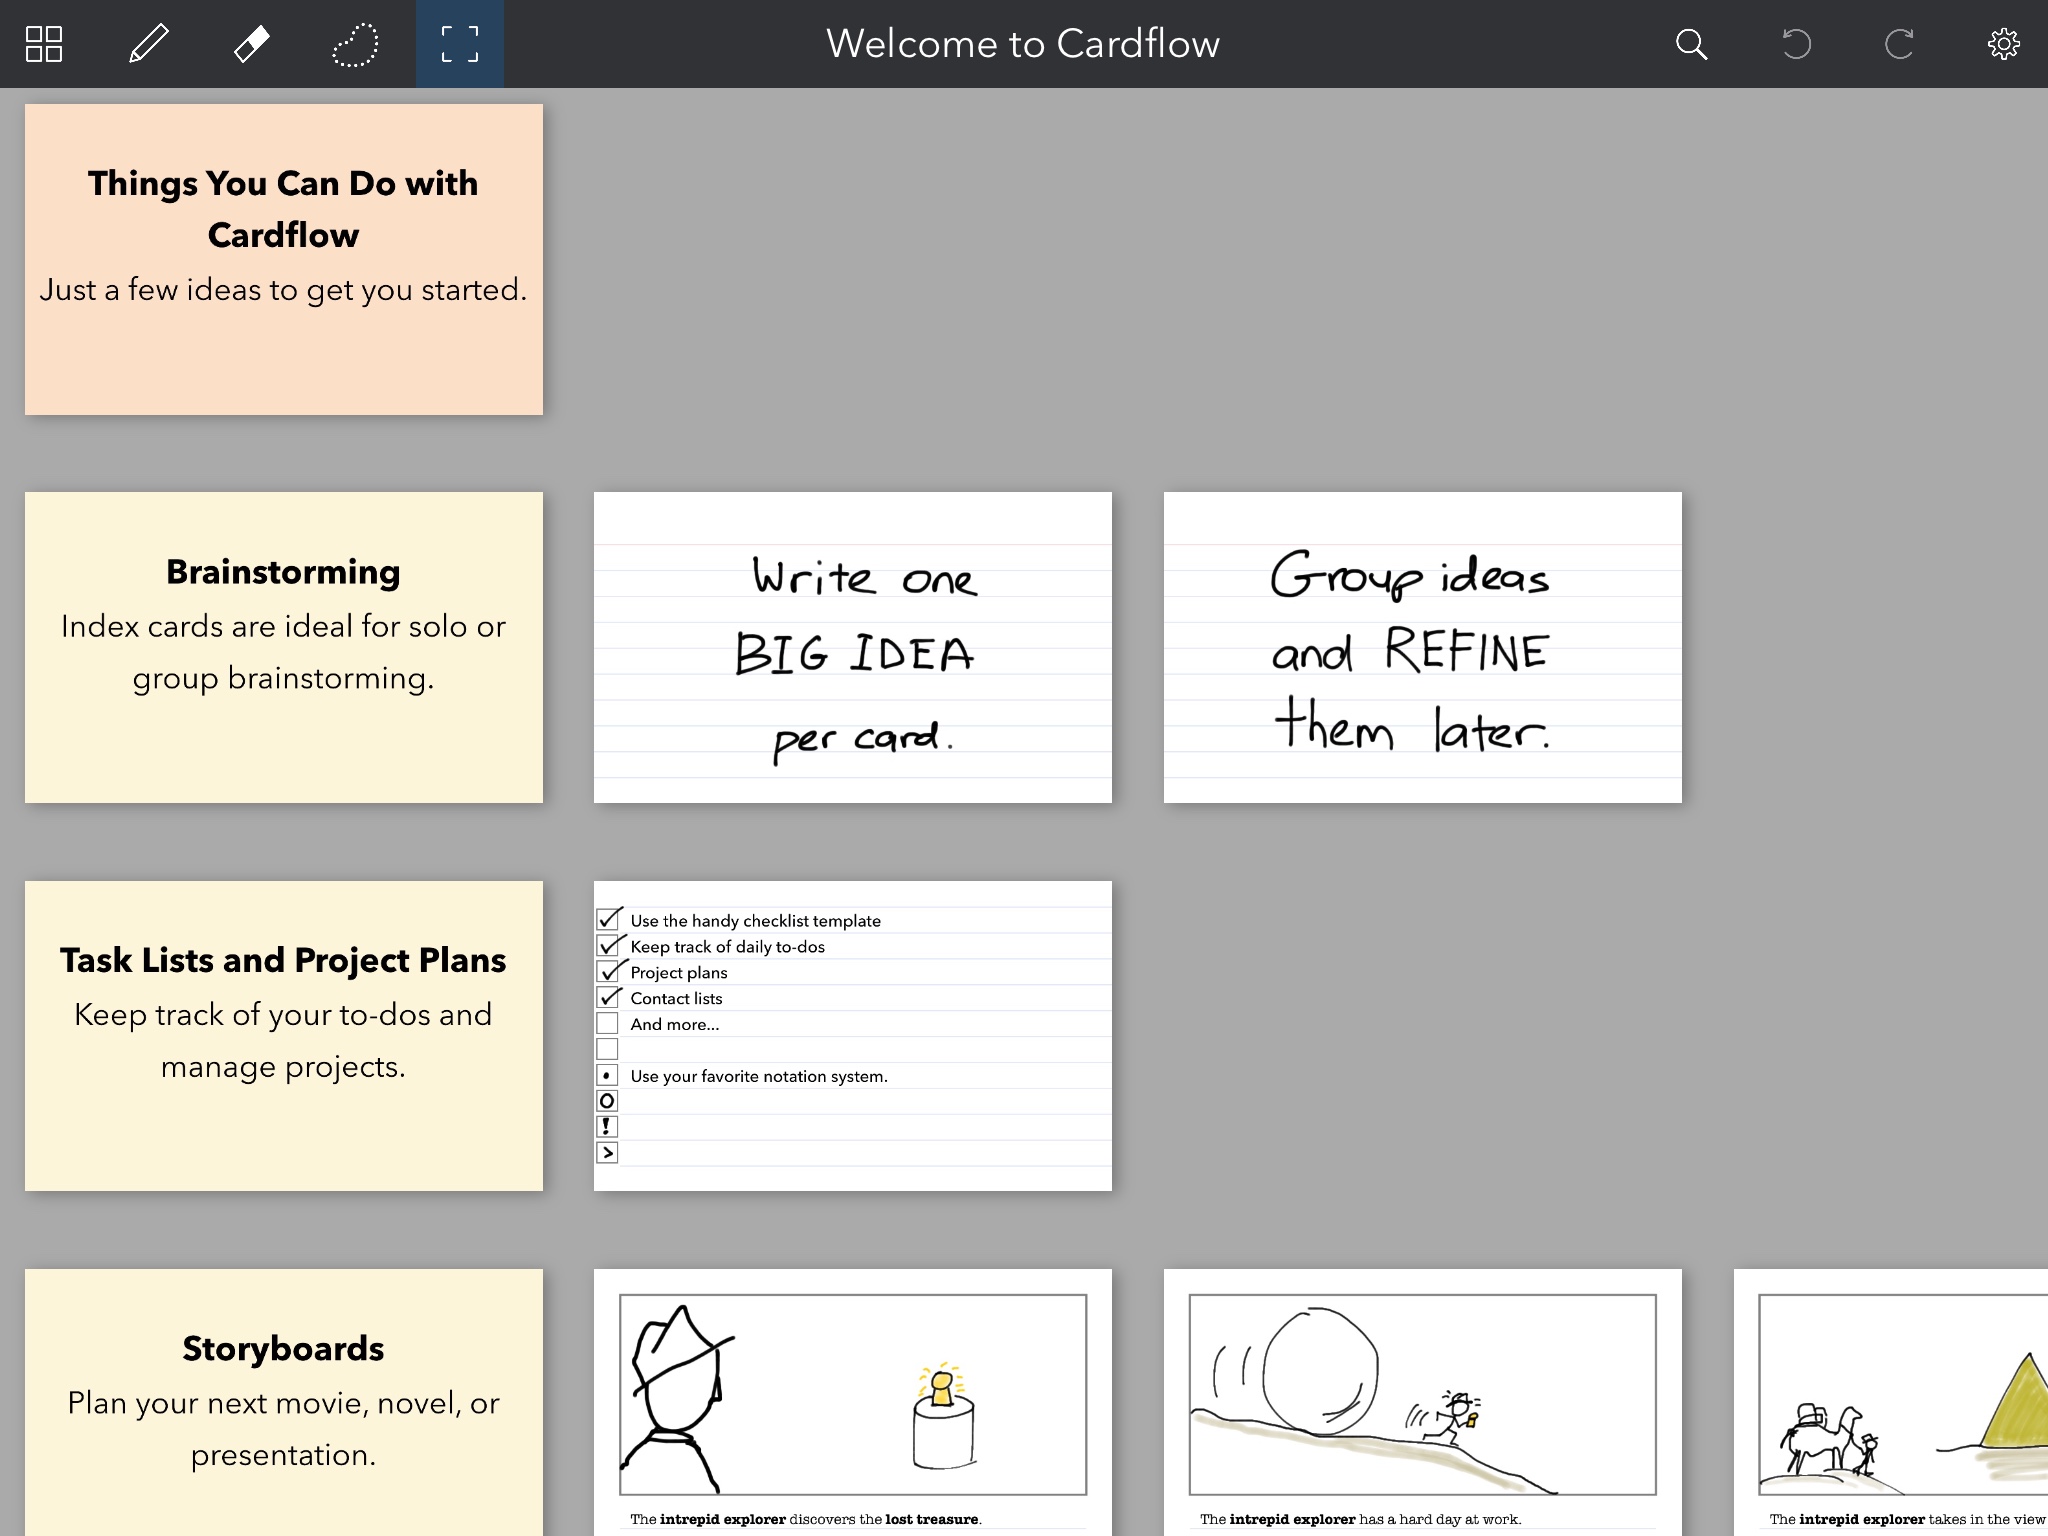
Each Cardflow document consists of a board with a number of cards arranged on it.
Pan and zoom around the board with two fingers.
By default, the Board Editor starts in Card Mode ( ), where you work with the cards (vs. drawing on the board).
Selecting Cards.
Lasso cards with one finger to select them.
You can also long-press on a single card to select it.
Moving Cards.
Drag selected cards to move them.
Flipping Cards.
Tap with two fingers to flip the selected cards.
If any selected cards are flipped, they will all flip to the front, otherwise they will all flip to the back.
This makes it easy to quicky get multiple cards on the same side.
Deleting Cards.
Tap on a selected card, then tap "Delete" to delete the selected cards.
Magic Arrange.
Select two or more cards then swipe with 3 fingers in different directions to arrange them into stacks, rows, columns, or grids.
Swipe to the top left to randomly shuffle the selected cards.
Make sure the Accessibility Zoom feature is turned Off for this to work.
You can also tap the buttons in the lower left:

From left-to-right:
- Vertical stack
- Diagonal stack
- Vertical column
- Horizontal column
- Grid
- Random shuffle
- Sort by text
Check out a video of Magic-Arrange in action.
Text Search.
Tap the Seach button to select cards that contain specified words.
This is also handy to quickly select cards tagged with a word, to move or arrange.
The text can be on the front or back of the card.
Modifying Multiple Cards.
Tap on selected cards to show options you can apply to all of them.
You can change the templates or colors of multiple selected cards at once.
Copy and Paste.
You can copy selected cards from one board to another.
Copy and Paste Styles.
When you select a single card, you can also copy its styles (color, template, and text settings), then paste them to other cards.
Board Color. Change the board color from the Board Settings menu (gear icon).
Exporting to PDF.
From the Board Settings, you can export to PDF - either the whole board on a single page, or each card on a separate page.
Tip: Select a set of cards before selecting "Export" from the action menu to export just the selected cards.
Printing.
To print a board, first export it as a PDF, then select "Print" from the Share Dialog.
Snap to Grid. You can also toggle snap-to-grid from the gear menu.
This is handy if you really need you cards to line up exactly right (we understand).
Adding Cards. Double tap to add a card, or tap once on the board and chose "Add Card" from the context menu.
Editing Cards.
Tap on an unselected card to edit it.
Exporting to and Importing from CSV.
Likewise, you can export just the card text to a comma delimited (CSV) file.
The CSV file will have four columns with:
- The front text,
- The back text,
- The front web url, and
- The back web url.
Exported CSV files can be edited in an app such as Numbers, then re-imported back into Cardflow via "open in...".
To export a board from Cardflow+ to Numbers (both apps must be installed on the iPad):
- Open the board in Cardflow
- Tap the settings button
- Select Export...
- Select Cards' Text as CSV
- Select Numbers from the apps list (scroll right as needed)
To export data from Numbers back to Cardflow+:
- Open the spreadsheet in Numbers
- Tap the options (...) button
- Select Export
- Select CSV
- Select Cardflow+ from the apps list (scroll right as needed)
- This will create a new board in the Cardflow+ gallery
This is a handy way to quickly create or import a lot of information, such as for flash study cards.
The Palette

The Board Editor and Card Editor share several common tools.
Tap on the pen icon ( ) to enter Draw Mode.
This lets you draw directly on the Board.
) to enter Draw Mode.
This lets you draw directly on the Board.
Tap on the pen icon again when it is selected to toggle the palette.
Draw in Front or Behind.
There are two drawing modes: Front (default) and Behind.
This is indicated by the two icons at the left of the palette.
Select Behind to draw behind existing ink.
Very handy for adding background splashes to call out particular elements, or adding shadows.
Shape Recognizer. Tap the Shape button to activate the Shape Recognizer.
As you draw, Cardflow will attempt to recognize basic shapes and draw straightened versions automatically.
It recognizes lines, circles, triangles, squares, and rectangles.
Tip: This is handy for drawing grid lines on the board. Use this with the grid card template for layout projects.
Here's a video of the Shape-Recognizer doing its thing.
Pen opacity.
Tap the opacity button ("100%") to reveal the opacity slider.
Change this to make the ink more transparent.
Custom Colors.
Tap on the selected color to customize it.
You can reset the color palette from the App Settings menu in the Gallery.
Erasing Ink.
Tap on the Eraser icon ( ) to enter Eraser Mode.
Tap on the Eraser icon when it is selected to erase all ink.
) to enter Eraser Mode.
Tap on the Eraser icon when it is selected to erase all ink.
Selecting and Editing Ink
Cardflow uses an improved version of the Inkflow Engine, which features vector ink that can be moved and resized without loss of information.
We've tuned the ink settings in Cardflow to be great for writing and sketching.
Selecting Ink.
Tap on the Selection icon ( ) to enter Selection Mode.
Lasso ink to select strokes.
Drag the selection to move the ink.
Drag the round rotation grip at the top of the selection to rotate ink.
Drag the resize grip in the bottom right of the selection to resize it.
) to enter Selection Mode.
Lasso ink to select strokes.
Drag the selection to move the ink.
Drag the round rotation grip at the top of the selection to rotate ink.
Drag the resize grip in the bottom right of the selection to resize it.
You can also move, resize, and rotate ink by dragging the selection with two fingers.
Tip: When Snap to Grid is on, dragging selected ink on the board will move them in grid increments, handy for lining up multiple elements.
Color Separation.
When you select ink of more than one color, the list of selected colors appear at the bottom left.
By default, ink of all colors are selected, but you can tap on one or more colors to select just those colors.
This is handy to move or delete ink that's behind, without disturbing the foreground.
Use this to change hilights or shadows.
Copy, Cut, and Paste Ink.
Once you've selected some ink, tap inside the blue selection area to show ink edit options.
Tap copy to copy all selected strokes (which may extend outside the selection area).
The cut option works slightly differently: It breaks strokes at the selection boundary, and only copies the ink inside the blue selection area.
To paste copied or cut ink, tap outside the blue selection area once to clear it, then tap again to show the paste option.
Tip: You can copy ink from Inkflow and paste it into Cardflow.
Only ink (not text or photos) will be copied over.
Recolor selected ink.
Select the recolor option to change the color of the selected ink.
The Card Editor
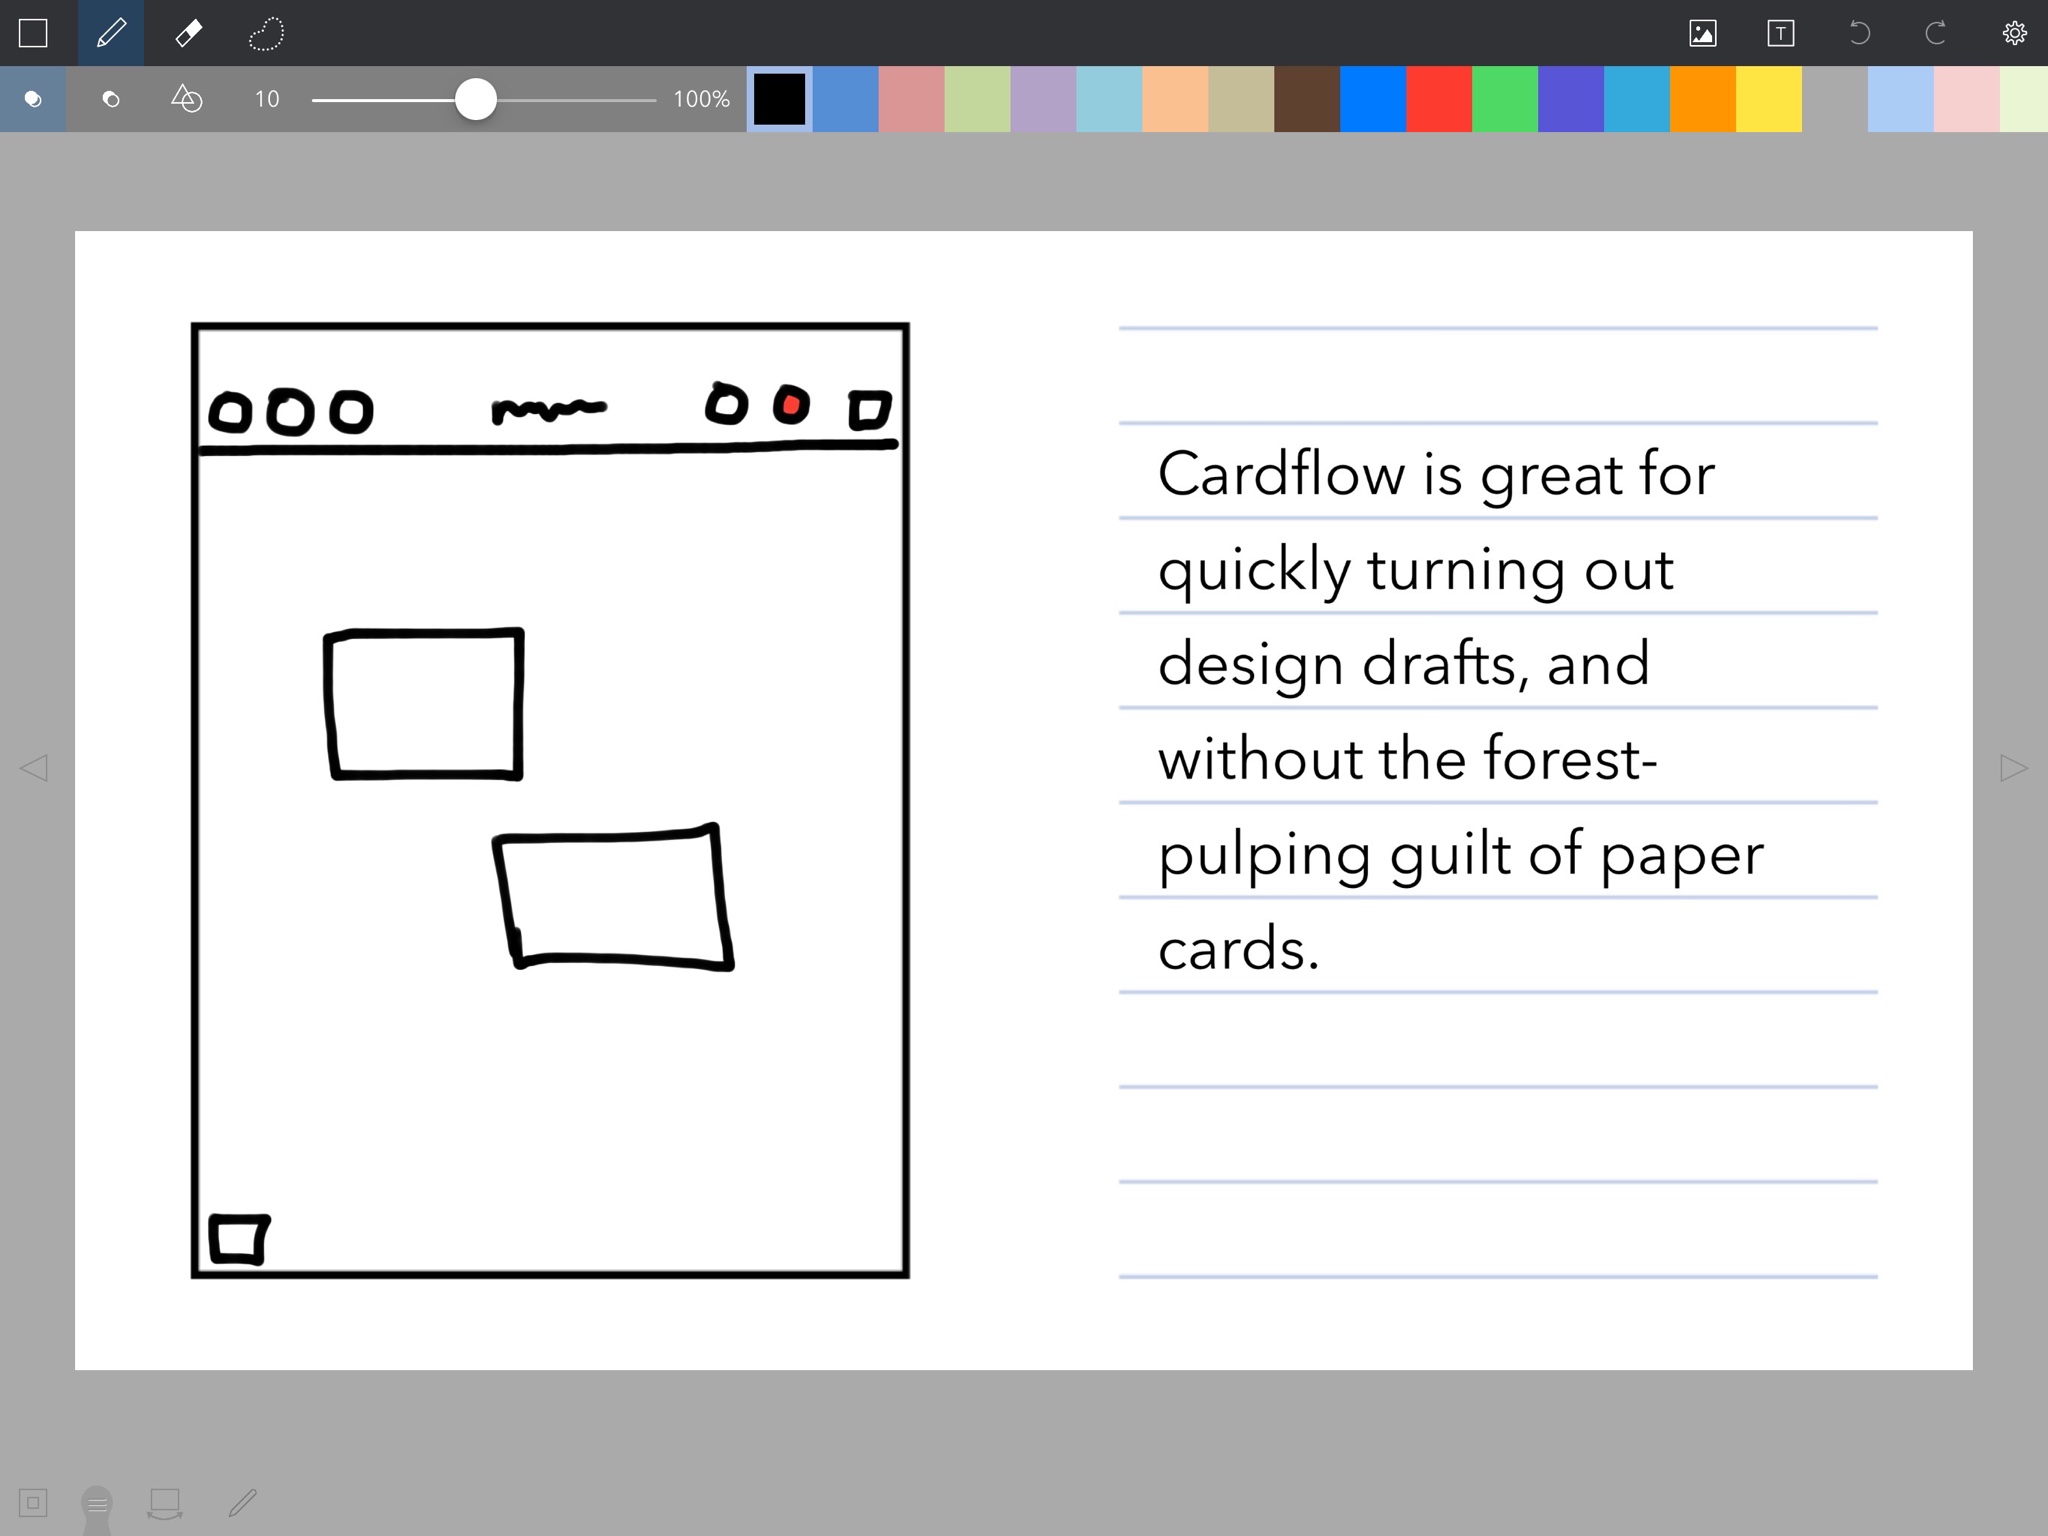
Each card is like a mini canvas.
You can write, draw, or type on it.
Paging Between Cards.
When viewing the card at 100% zoom, tap the left and right arrows on the sides of the screen to quickly switch to the next or previous card.
Tip: Select multiple cards in the Board Editor, tap on them, and select "Edit" to just page through that set.
Quick Zoom.
Tap the quick zoom button in the lower left of the screen to zoom all the way out and back again.
This is handy for adding details to notes or sketches.
The Wristguard.
Pull up the wrist guard by dragging the rounded gray tab to the right of the quick zoom button at the bottom of the screen.
You can rest your palm on this area without creating stray marks.
Tap on the tab to toggle the wrist guard.
Flipping Cards.
Tap with two fingers or tap the Flip-Card icon at the bottom left of the screen to flip the current card over.
A blue page indicator appears in the lower right of a card to indicate that it has content on the back.
Pencil-Only Drawing Mode.
If an Apple Pencil is connected, a Pencil icon will appear at the bottom left of the screen, next to the page-flip icon.
Tap this icon to toggle Pencil-Only Drawing Mode.
When engaged, only the Pencil will be used for drawing, completely eliminating any stray marks from your palm or fingers.
You can still use your fingers for other operations such as zooming or erasing.
For iOS 11+: Bluetooth needs to be turned on in the Control Center or Settings for the Pencil detection to function correctly.
Writing Notes
Cardflow is designed to make it easy to jot down quick notes on a card.
You can also zoom in to write more detailed notes.
Auto Advance.
When you zoom in, an auto-advance toggle appears in the bottom right of the screen.
Tap this icon to show an auto-advance zone on the right.
Now, whenever you write or draw into this zone, the screen will automatically scroll right after a brief delay.
You can also tap on the arrow and return buttons at the bottom of the auto-advance zone to manually shift the screen.
Tip: Zoom all the way in and use auto-advance to write out detailed notes.
Pictures
Inserting Pictures.
Tap the Picture button in the toolbar to insert a picture.
Each side of a card can contain one picture at a time.
Pictures are clipped to fit into the appropriate frame depending on the card template.
For example, it is sized to fit into the screen frame for the storyboard template.
Picture Toolbar. The Picture Toolbar is automatically shown when Inserting or Resizing a picture.
Drag and pinch the picture to position it within its frame.
Tap the toolbar buttons to fit or fill the picture in the frame.
Tap the done button on the top right to exit the Picture toolbar.
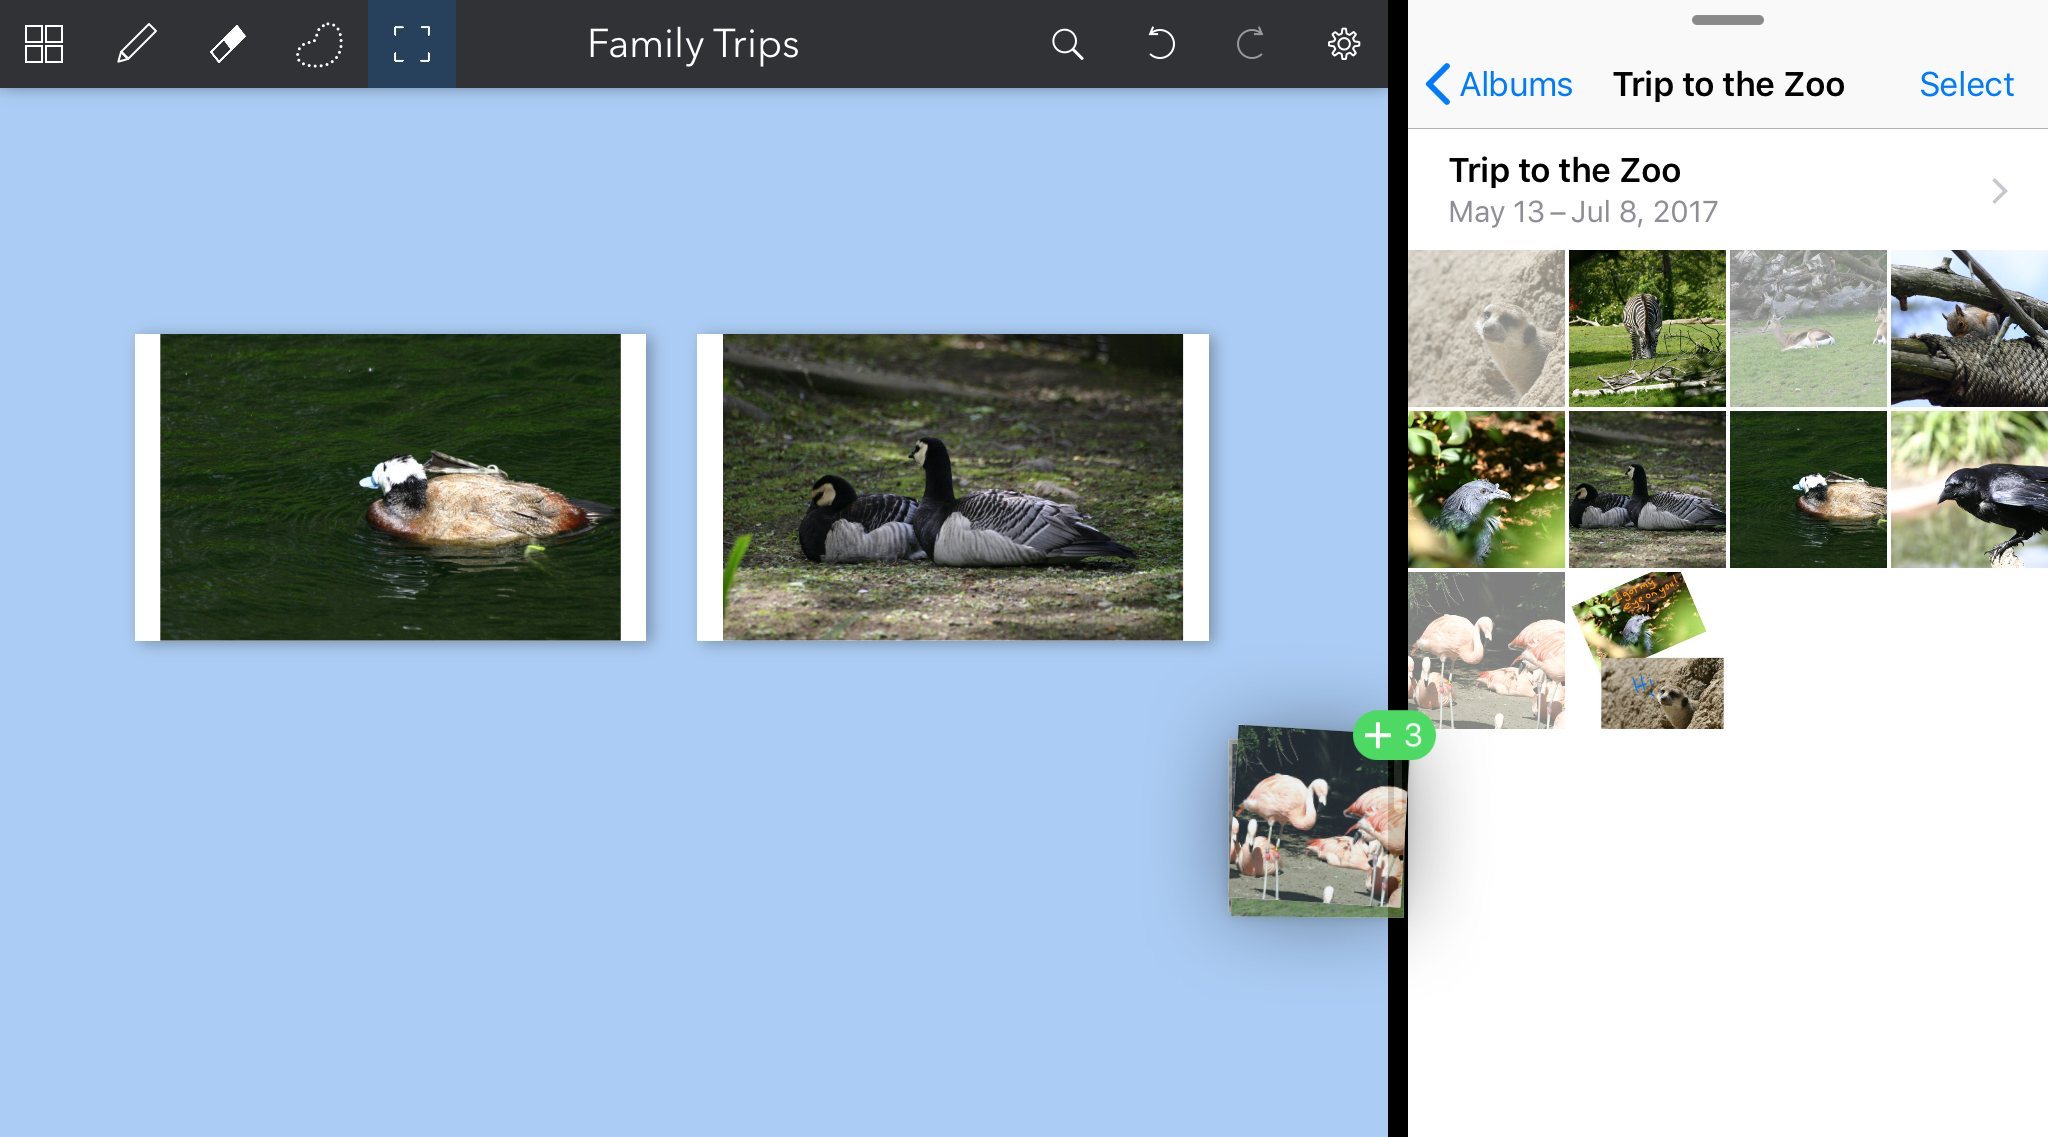
Drag and drop: You can drag and drop multiple images at a time from the Photos App.
Use Split View to put Photos side-by-side with Cardflow+, then drag images onto the board.
While dragging one image, tap on others to select more than one to insert at a time.
Each image is inserted on a new card.
Web Pages
Inserting Web Pages.
Tap the Picture button in the toolbar and pick "Insert Web Page".
Use the web browser to navigate to or search for the page you want.
This will set the card's picture to a thumbnail of the webpage and add a link in the top right of the card.
Tap on the link in Selection Mode to visit the web page.
You can link to any web page, including online videos, photos, articles, and your own private documents stored online.
Cloud storage services such as Dropbox allow you to link to your files.
Just copy and paste those links into Cardflow's web browser to create cards that represent them in your projects.
You can use this capability to create boards to organize files for each of your ongoing projects or clients.
Card Links
Adding Links.
The easiest way to add links is from the board editor: Tap and hold on an unselected card until the blue selectino glow appears.
Now drag your finger off the card, either to another card or to an unoccupied part of the board to create a link.
You can also ad links from the Card Editor. Pick the option from the setting menu, or tap on the card in Selection Mode and pick "Add Link" from the context menu.
Navigating Links.
Tap on a link in Selection Mode to open the linked card.
Resize and Position Links.
Pick the "Position Links" option from the action menu, or from the Selection Mode context menu.
Drag the bottom right corner of a link to resize it, or drag it from anywhere else to position it on the card.
Tip: Position links over parts of wireframe prototypes to create interactive "tap-through" experiences that you can share.
Both web and card links continue to work in exported PDFs, even when opened on other platforms.
Removing Links.
In the Card Editor, pick the "Position Links" option from the action menu, or from the Selection Mode context menu.
Tap on a link in Selection Mode, and tap "Remove Link".
You can also remove links in the Board Editor:
- In selection mode, select one or more cards
- Tap on a selected card (or tap and hold on a single card)
- Tap "Remove Links" from the context menu
Typing Text
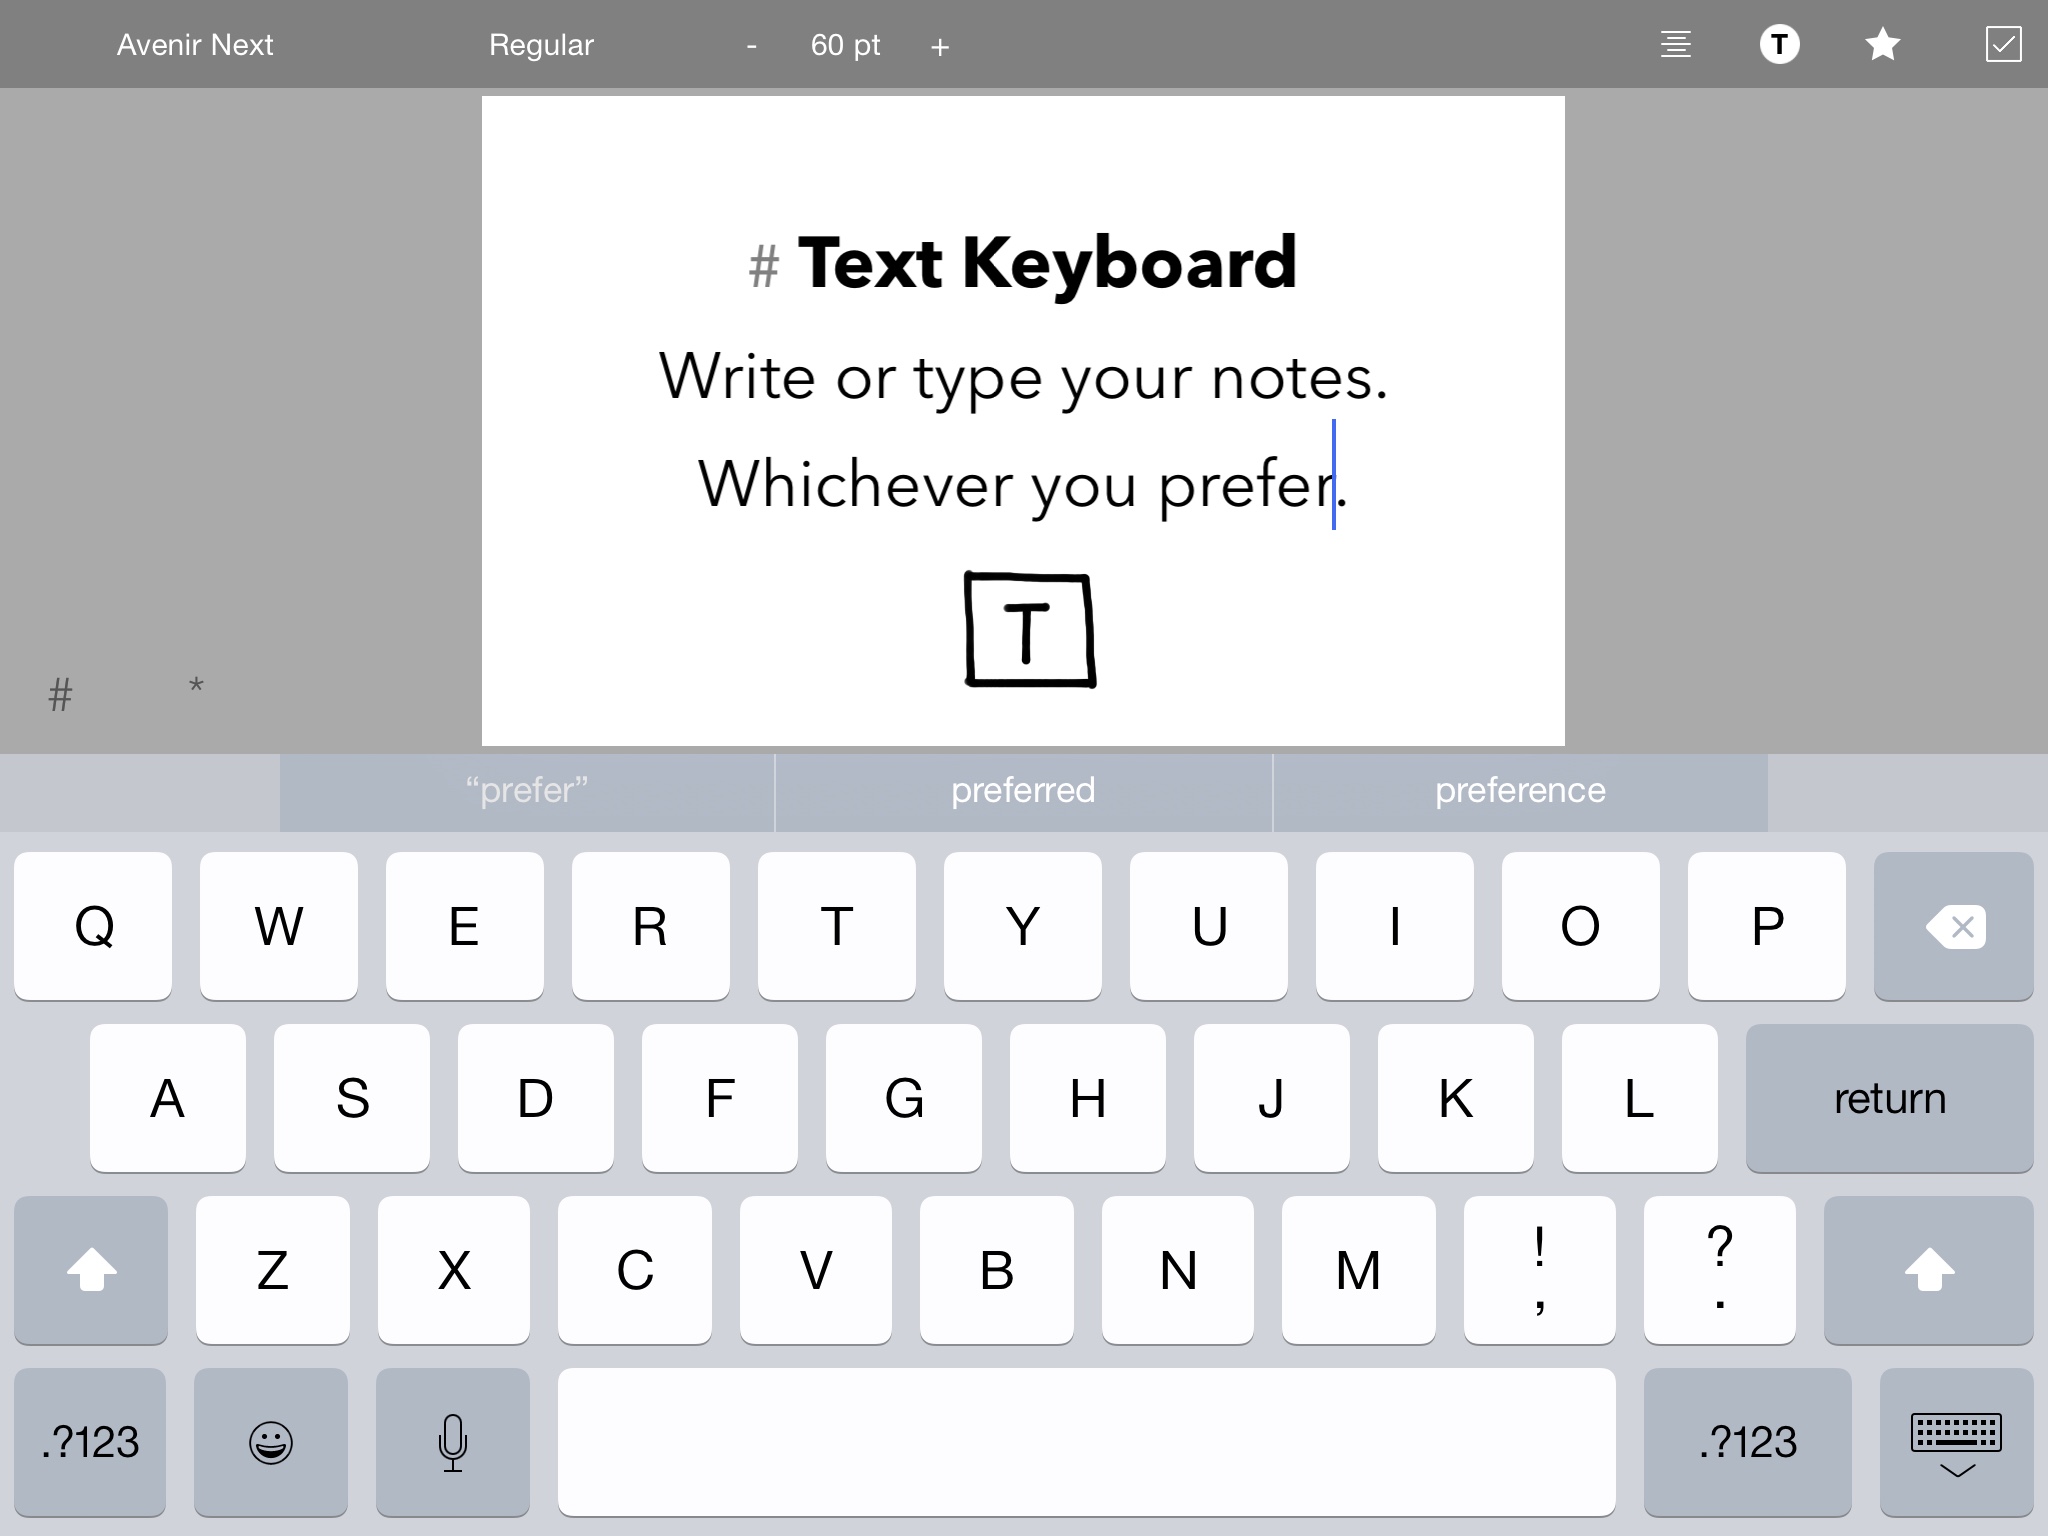
While you can write out all your notes in longhand, you can also choose to type instead.
Tap on the text icon in the toolbar to open the text editor.
The editor supports basic formatting using a simple markup system:
Headings.
Put a pound (#) character at the beginning of a line, followed by a space to make text on that line appear as a heading.
Emphasized (italic) text.
Enclose words with a single asterisk (*) to make them appear in italic.
"This is *emphasized text*." appears as "This is emphasized text."
Bold text.
Enclose words with a two asterisks (**) to make them bold.
"This is **bold text**." appears as "This is bold text."
Text Color. Tap the T-in-a-circle icon to change the text color.
Default Style. Tap the Star icon to save the current text settings as the default style, or reset to the default style.
Keyboard Shortcuts
You can perform most navigation and text operations with an attached hardware keyboard.
In the Board Editor, use the arrow keys to select a card, then press Enter/Return to open it.
In the Card Editor, the arrow keys are used to navigate to adjacent cards.
Press Cmd+T to toggle text mode. Cmd+F flips the card, and Cmd+N inserts a new card.
Press and hold the Cmd key alone to see a list of keyboard shortcuts for that screen.
Card Settings
Tap on the gear icon to show options for the card.
Templates.
You can change the template (background image) for the card.
Different templates affect the position of text on the card.
Card colors.
You can also select the color for the card background or text.
Transferring Boards to Cardflow+
To transfer a board from Cardflow to Cardflow+:
- First make sure both Cardflow and Cardflow+ are installed.
- In the Cardflow gallery, tap on the board name (or tap and hold on the board icon).
- Select "Transfer", then pick Cardflow+ from the list of Apps.
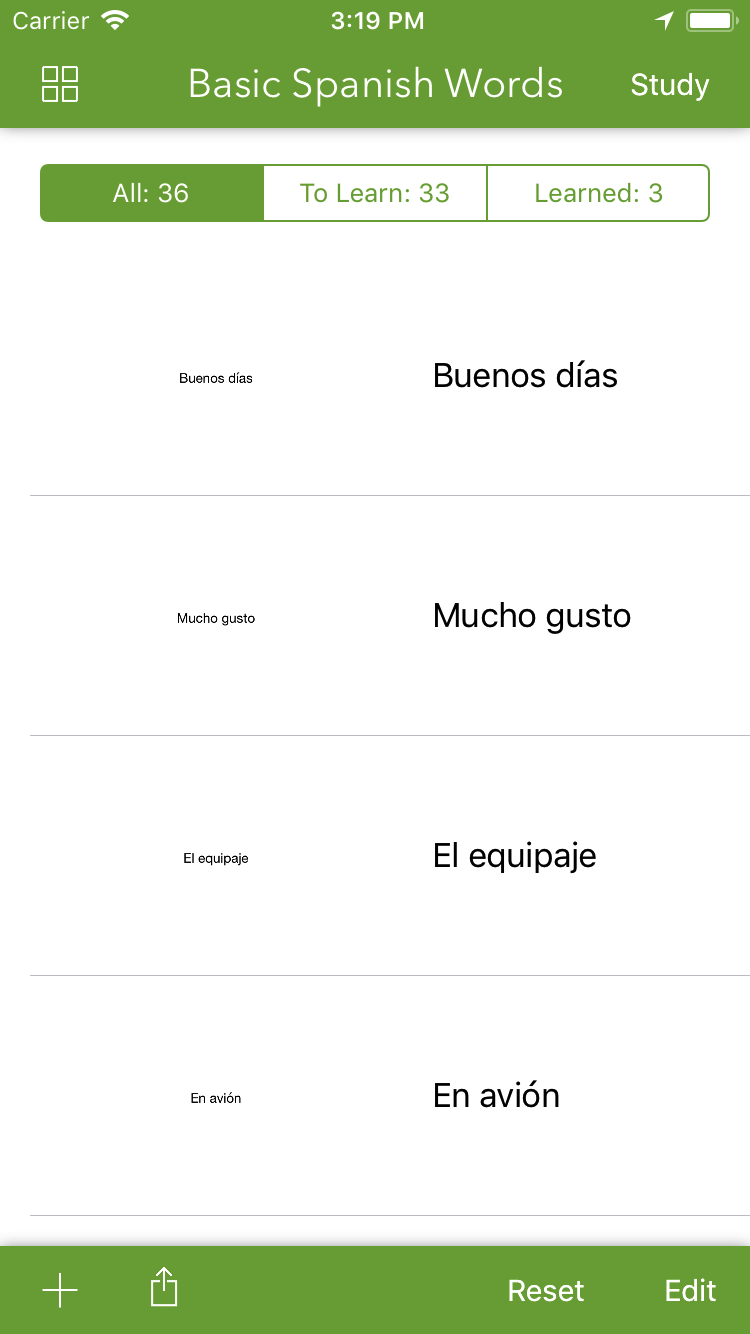
Flash Cards for iPhone and iPad
You can export cards from Cardflow+ to our free companion Flash Cards app.
The Flash Cards app lets you study anywhere, on your iPhone or iPad.
Test yourself while on the bus, or first thing in the morning.
To export cards from Cardflow+to the Flash Cards app:
- Tap the Settings / Action button from the Board Editor
- Tap Export...
- Select "Cards as Flash Cards"
- Pick the Flash Cards app from the list
Backing-Up Your Files
Your data is very valuable. Please take a few simple steps to make sure you don't lose something important.
While automatic iCloud backups (if you have turned them on) offer a limited amount of protection, the truth is that nothing can replace manually backing up your important files regularly.
We strongly recommend using iTunes File Sharing to routinely copy your books to a secure backup location.
Please read this article for more details, and about the different ways you can keep your data safe.
Cardflow for Mac
You can work with your files seamlessly across iOS and Mac. Download the Mac version of Cardflow from the Mac App Store here.
Auto-synching files with iCloud
Here's how to store your files in iCloud and have then auto-sync across multiple iPads and Macs:
First, make sure you have iCloud Drive enabled on both iOS and on your Mac.
In Cardflow+ on iOS:
Tap on a board's name, then tap "Copy to Cloud". Select iCloud and a folder (e.g. Documents).
To edit files directly in iCloud:
Tap on the cloud icon in the toolbar to open a board stored in the cloud.
The changes you make will be auto-saved back to that location.
Note: While we have tested synching extensively with iCloud, we cannot guarantee data integrity when using any cloud service provider, particularly 3rd party providers who provide the file system integration with iOS.
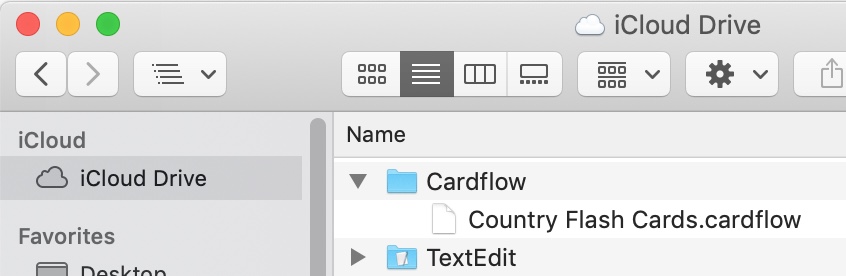
On your Mac:
The file should appear in the selected iCloud folder in a few moments.
Double-click on the file to open it in Cardflow.
Note: Cardflow does not support simultaneous editing. i.e. don't work on the same file at the same time on multiple devices, which can lead to data loss.
Close the file on one device before editing it on another.
Please remember to back up any important data.
Feature Videos
Also be sure to check out our videos on some of Cardflow's advanced features in action.
Back to the Cardflow homepage.